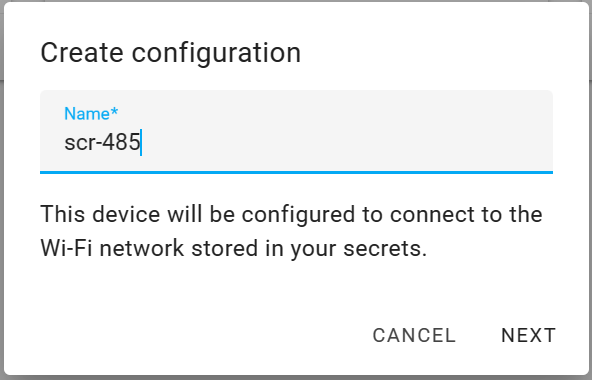
Applications for the linear power controller SCR-485
Hi.
I'd like to apply for this.
I have a hot water system with a resistive load of 3.5kW. I have 30kW solar with a 3 phase grid connection and Tesla Powerwall.
I use iammeter cloud with 1 x WEM3080T and 4 x WEM3080, I also poll the APIs locally for use in home asistant.
The WEM3080T monitors the grid connection, 1 of the WEM3080 monitors the battery and the other 3 monitor the solar production at various convenient collection points.
I have not paid a power bill in 5 years and I am in credit each quarter by $200-$300 depending on the season/weather with an 8c FIT. My hot water system is currently being controlled by Home assistant to run during solar maximum, and currently is set to not turn on if there is insufficient spare power - {{ states('sensor.entire_site_solar_generation') | float - states('sensor.live_power_usage_2') | float > 4}} only turn on if there's 4kW of spare solar available. Some days I can't heat the water without dipping into the bettery, this would be great to lower the heating element wattage to suit the available power as a proof of concept!


please provide the spec of the resistive load, like this https://www.solahart.com.au/products/solar-water-heating/solahart-l-series/302l/
we need to confirm whether the load is compatible with SCR-485 (voltage and current are within the rating of SCR-485)
Hi. Does this give you what you need?
It's a VULCAN 3.6kW max single phase 240VAC (Standard Australian SIngle Phase), although in reality the consumption is less as per the graph supplied above.
Thanks for your information.
I do not find the definition of the "Power rating " in the user manual , do you know what this parameter means?

Hi.
This unit as far as I'm aware can have multiple heating elements up to 4.8kW to suit various requirements based on the customer's needs. As you can see both from my supplied meter data, and the specifications on the sticker (3600w) this unit has one single heating element of 3.6kW consuming in reality roughly as designed. This unit is the most basic and cheapest variant. You can see from the upper graph I supplied in the original post the wattage never exceeds 3500w.
It's a mains pressure immersion heater with resistive element.
The really surprising thing for me is that after 23 years, the model is still available new!
Doing more research, it looks to be a circuit max power insofar as the HWS can't be on a circuit whereby the max power can exceed 10kW. In my case the hot water is the only device on the circuit, it's dedicated to hot water use only.
From my research.
It is common for electrical equipment, including hot water systems, to adhere to specific electrical standards and regulations in Australia. The Electrical Regulatory Authorities Council (ERAC) oversees these standards, and compliance ensures the safety and reliability of electrical installations and appliances. Here's how these standards might relate to the total circuit load rating:
Wiring Rules (AS/NZS 3000): This standard provides guidelines for the installation of electrical wiring systems. It includes provisions for circuit design, load calculations, and overcurrent protection. Hot water systems, being high-power electrical appliances, must adhere to these rules to ensure they are safely connected to the electrical supply.
Electrical Equipment Safety Standards (AS/NZS 3820): Hot water systems must comply with safety standards to protect against electrical hazards. These standards specify requirements for insulation, earthing, and protection against overcurrents, ensuring that the equipment operates safely under normal and fault conditions.
Maximum Demand Calculation: Electrical installations are designed to accommodate the maximum expected demand for power. This includes considering all connected loads on a circuit, such as lighting, appliances, and hot water systems. The maximum demand calculation ensures that the circuit and supply infrastructure can safely handle the total load without overloading.
Circuit Protection Devices: Circuit breakers and fuses are used to protect electrical circuits from overcurrents. These devices are selected based on the maximum demand calculation to ensure they can interrupt the circuit safely in the event of a fault or overload.
Given these standards and regulations, specifying a maximum total circuit load rating for hot water systems is a common practice in Australia. It helps ensure that installations comply with safety requirements and can safely operate within the limitations of the electrical supply infrastructure.
We have sent you an email; please check your inbox.
Hi
The device just arrived. I’ll look to install over the weekend. In
the meantime, I’ve popped it onto the WLAN and fixed the IP using the router
DHCP table. Home assistant finds it straight away and it’s
configured. The scr485 device is at 192.168.1.247, the WEM3080T is
located at 192.168.1.244 also fixed.
Now, what’s the best method to edit the
scr-485.yaml file on the device? I can access its webpage but I can’t
access any filesystem
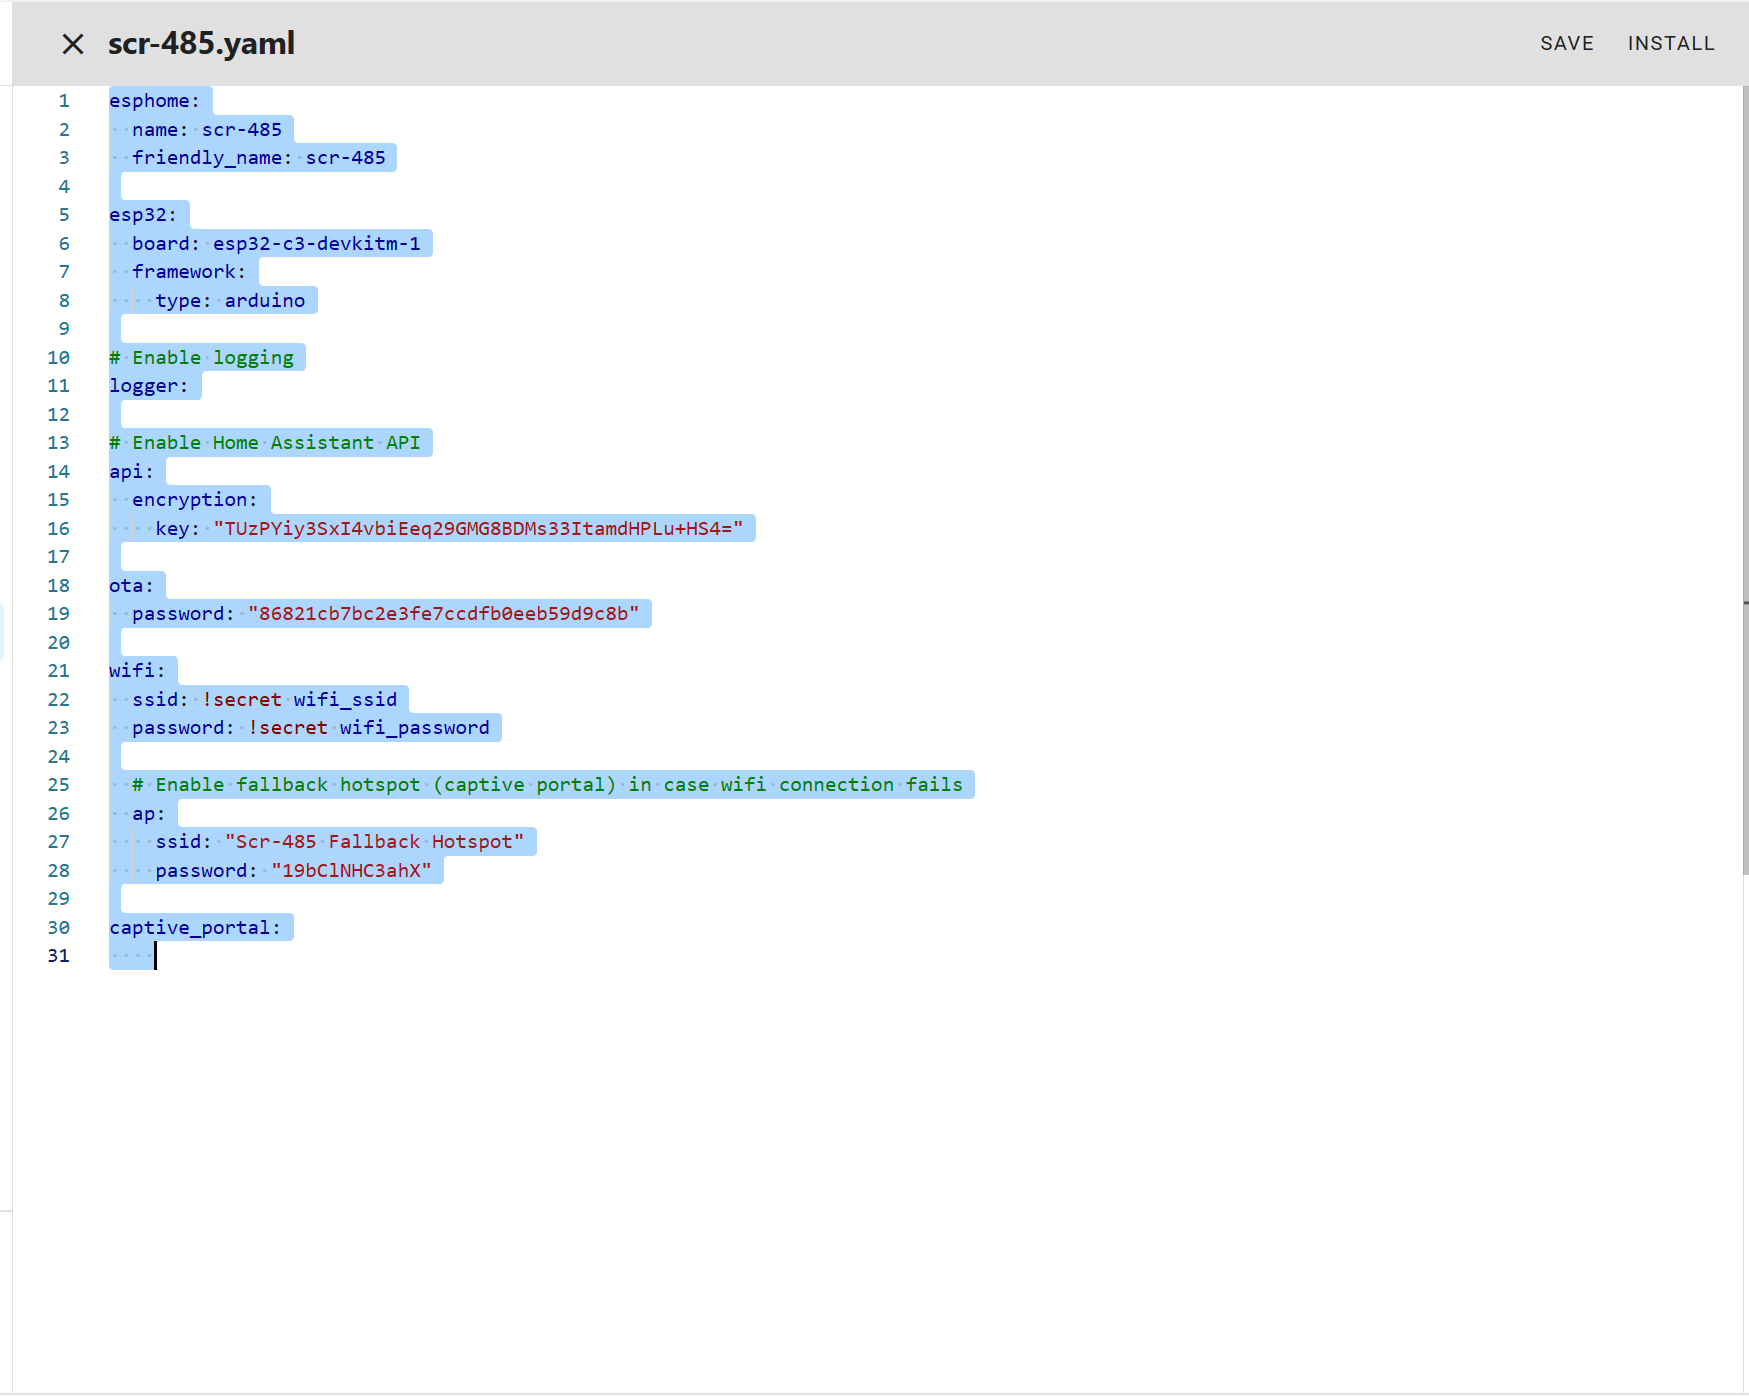
Here’s my yaml edit, are you able to verify these changes are OK? I’ve
highlighted the changed lines in bold and red, although it may not display as intended. I believe you will know the sections of the file (lines 176 and 226 i believe)
With regard to the 2nd change I have PV inverters attached to all 3 phases, so would this be correct?? int32_t tmp_grid_power = root["Datas"][3][2];
Some images also at the end of this message
esphome:
name: scr-485
friendly_name: scr_485
platformio_options:
# platform: https://github.com/platformio/platform-espressif32.git#feature/arduino-upstream
board_build.flash_mode: dio
esp32:
board: esp32-c3-devkitm-1
framework:
type: arduino
# Enable logging
logger:
level: DEBUG
# Enable Home Assistant API
api:
# encryption:
# key: "sgCuRJxLsye8p+zn6/0+TaijdeinqqayDoHTboX6TlQ="
reboot_timeout: 0s
ota:
# password: "279ec37f5bec6c4097b63bf9af78d375"
wifi:
ssid: !secret wifi_ssid
password: !secret wifi_password
# Enable fallback hotspot (captive portal) in case wifi connection fails
ap:
ssid: "Scr-485"
# password: "12345678"
web_server:
port: 80
local: true
time:
- platform: sntp
id: sntp_time
servers: ntp5.aliyun.com #NTP服务器地址
timezone: Asia/Shanghai
captive_portal:
globals:
- id: auto_mode
type: bool
restore_value: true
initial_value: 'false'
http_request:
useragent: esphome/device
timeout: 10s
id: http_request_data
uart:
id: mod_bus
tx_pin: 0
rx_pin: 1
baud_rate: 9600
stop_bits: 1
modbus:
# flow_control_pin: 8
id: modbus1
modbus_controller:
- id: modbus_device
address: 0x01 ## address of the Modbus slave device on the bus
modbus_id: modbus1
setup_priority: -10
update_interval: 1s
sensor:
- platform: modbus_controller
modbus_controller_id: modbus_device
name: "scr_485_adc_read"
id: im1266_voltage
register_type: holding
address: 0x0001
# unit_of_measurement: "ADC"
value_type: U_WORD
# accuracy_decimals: 4
# filters:
# - multiply: 0.0001
- platform: template
name: "Grid Power"
id: grid_power
unit_of_measurement: "W"
update_interval: 1s
- platform: template
name: "Grid Power REV"
id: grid_power_rev
unit_of_measurement: "W"
update_interval: 1s
number:
- platform: modbus_controller
modbus_controller_id: modbus_device
id: scr_485_set_adc
name: "scr_485_set_adc"
address: 0x0002
value_type: U_WORD
# multiply: 1.0
min_value: 0
max_value: 4096
- platform: template
id: max_power
name: "Max Power"
optimistic: true
min_value: 1
max_value: 3500
step: 1
initial_value: 3500
unit_of_measurement: "W"
- platform: template
id: threshold
name: "Threshold"
optimistic: true
min_value: -200
max_value: 200
step: 0
initial_value: -20
unit_of_measurement: "W"
- platform: template
id: hysteresis
name: "Hysteresis"
optimistic: true
min_value: 0
max_value: 200
step: 0
initial_value: 50
unit_of_measurement: "W"
- platform: template
id: set_power
name: "Set Power"
unit_of_measurement: "W"
optimistic: true
min_value: 0
max_value: 3500
step: 1
# initial_value: 1500
on_value:
then:
- number.set:
id: scr_485_set_adc
value: !lambda |-
uint16_t input_val = id(set_power).state;
uint16_t output_val = 0;
uint16_t max_power_val = id(max_power).state;
if (input_val <= 0){
output_val = 0;
}else if (input_val <= max_power_val) {
output_val = 1450 + (input_val - 0) * (4096 - 1450) / (max_power_val - 0);
}else{
output_val = 4096;
}
return output_val;
interval:
- interval: 1s
then:
- if:
condition:
lambda: 'return id(auto_mode);'
then:
- http_request.get:
url: "http://192.168.1.247/monitorjson"
headers:
Content-Type: "application/json"
Authorization: 'Basic YWRtaW46YWRtaW4='
verify_ssl: false
on_response:
then:
- logger.log:
format: "Response status: %d, Duration: %u ms"
args:
- status_code
- duration_ms
- lambda: |-
json::parse_json(id(http_request_data).get_string(), [](JsonObject root) {
// WEM3080
if (root.containsKey("Data") && root["Data"].is<JsonArray>() && root["Data"].size() > 2) {
int32_t tmp_grid_power = root["Data"][2];
id(grid_power).publish_state(tmp_grid_power);
int32_t tmp_grid_power_rev = -tmp_grid_power;
id(grid_power_rev).publish_state(tmp_grid_power_rev);
int32_t tmp_threshold = id(threshold).state;
int32_t tmp_hysteresis = id(hysteresis).state;
int32_t tmp_set_power = id(set_power).state;
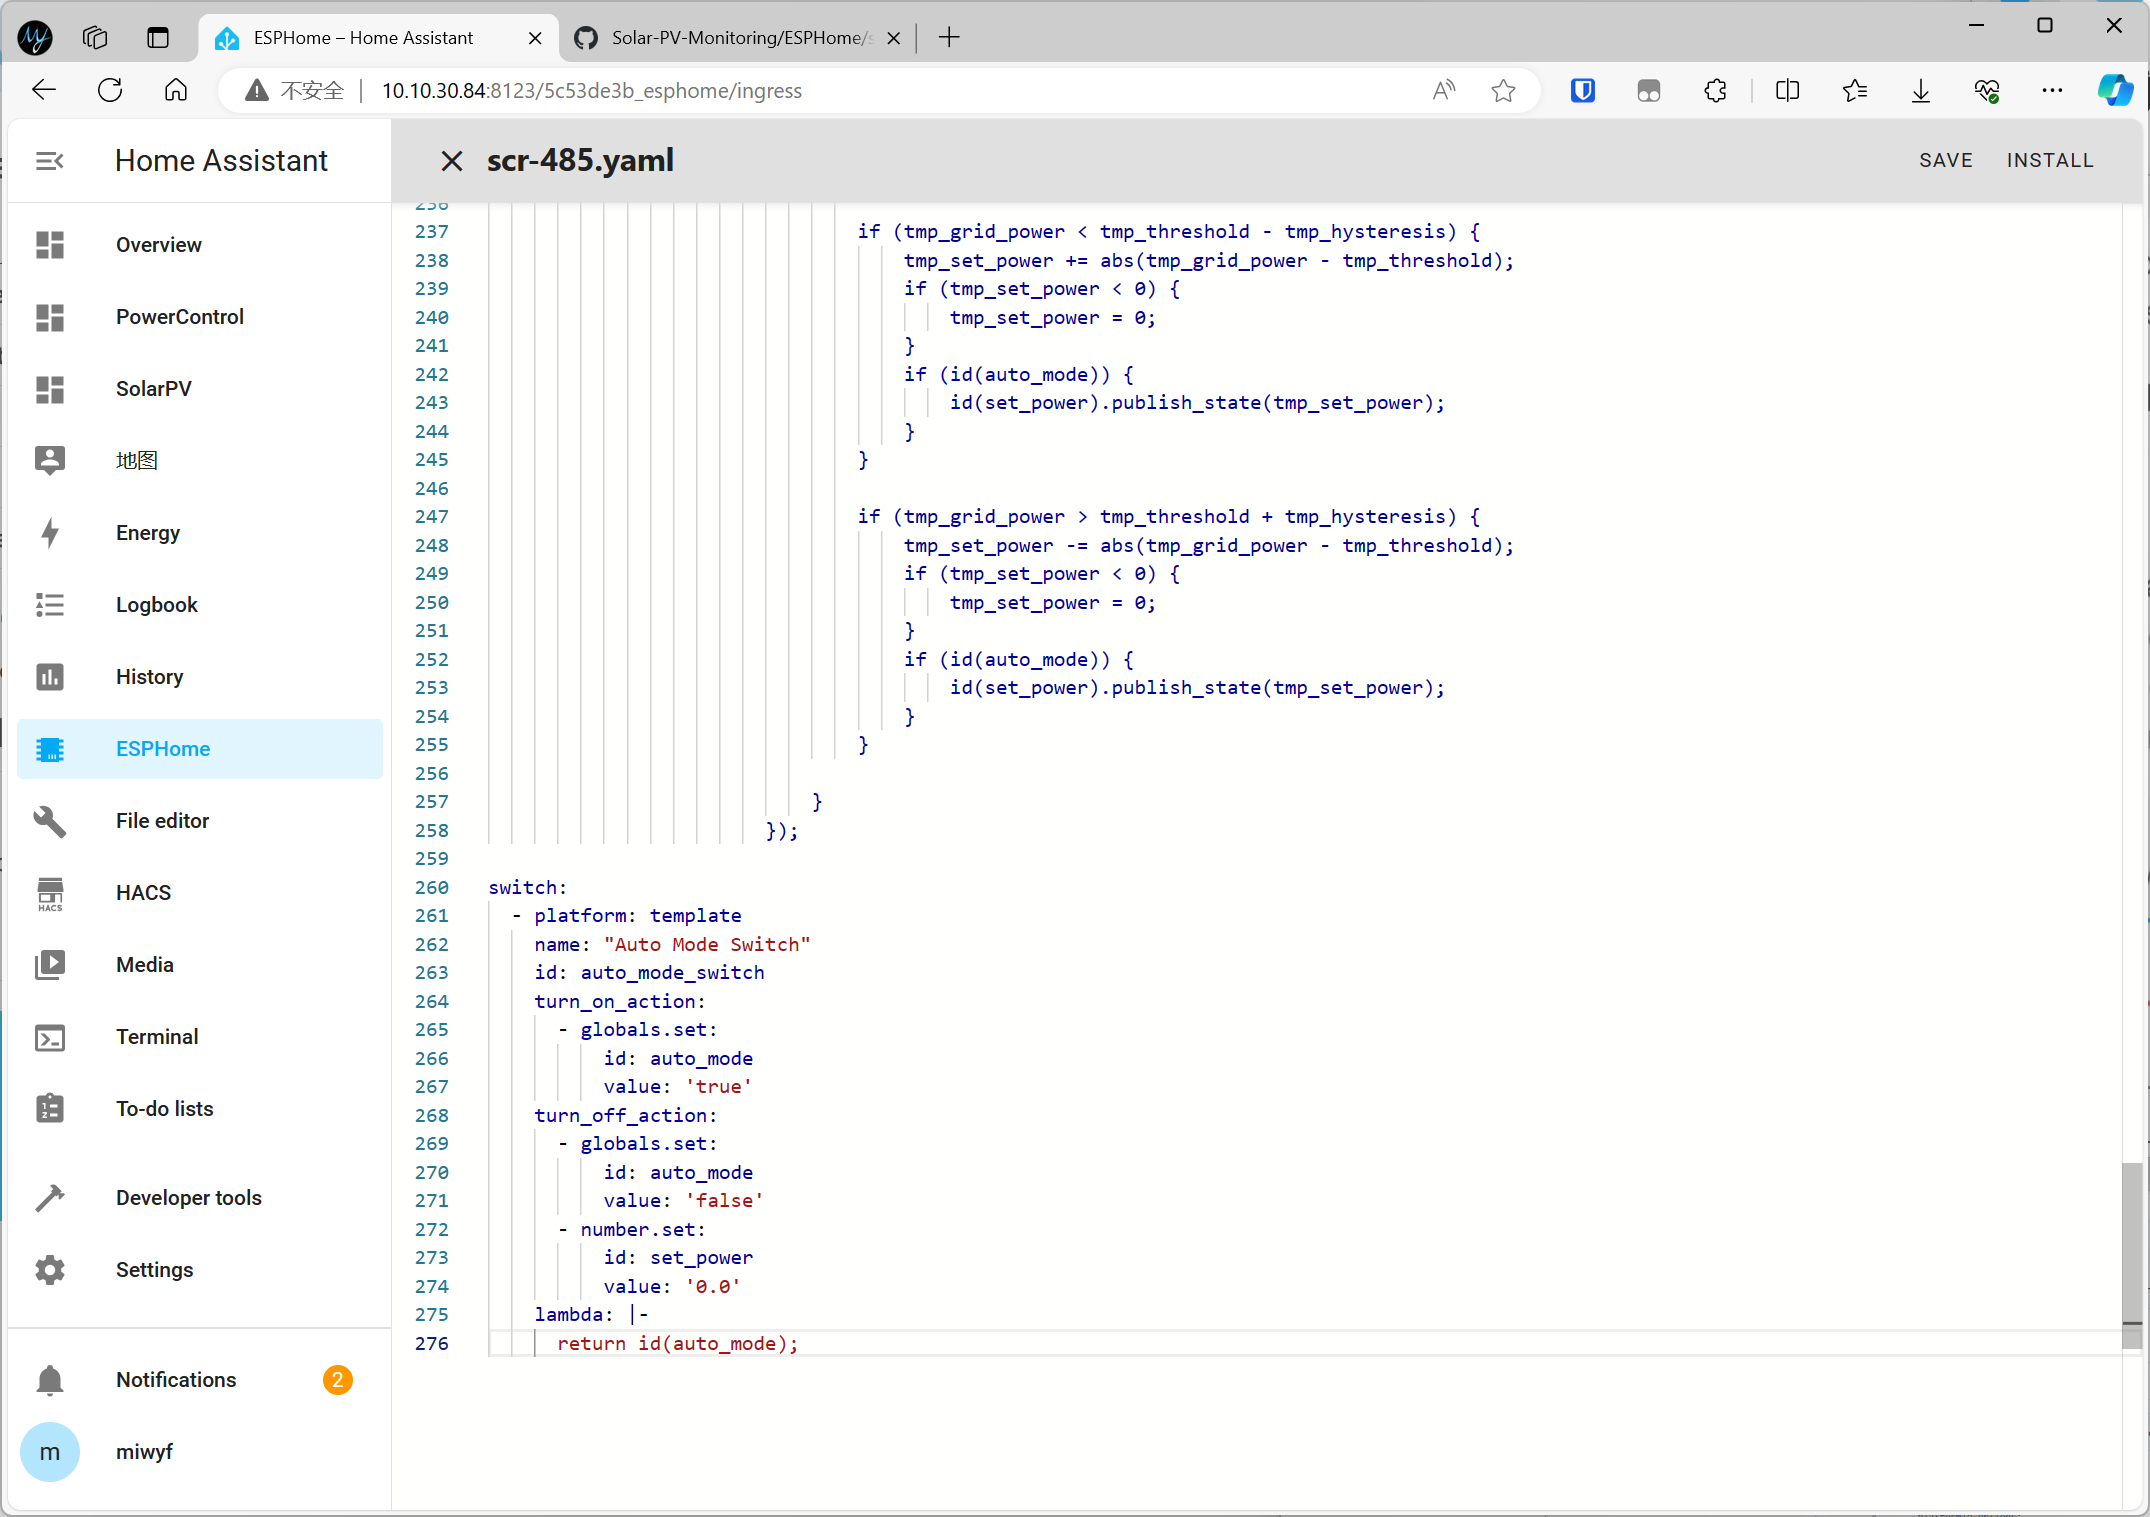
if (tmp_grid_power < tmp_threshold - tmp_hysteresis) {
tmp_set_power += abs(tmp_grid_power - tmp_threshold);
if (tmp_set_power < 0) {
tmp_set_power = 0;
}
if (id(auto_mode)) {
id(set_power).publish_state(tmp_set_power);
}
}
if (tmp_grid_power > tmp_threshold + tmp_hysteresis) {
tmp_set_power -= abs(tmp_grid_power - tmp_threshold);
if (tmp_set_power < 0) {
tmp_set_power = 0;
}
if (id(auto_mode)) {
id(set_power).publish_state(tmp_set_power);
}
}
}
// WEM3080T/WEM3050T/WEM3046T
if (root.containsKey("Datas") && root["Datas"].is<JsonArray>() && root["Datas"].size() > 2) {
// If your solar PV uses phase A, it is ["Datas"][0][2], if it is phase B, it is ["Datas"][1][2], if it is phase C, it is ["Datas"] [2][2]
int32_t tmp_grid_power = root["Datas"][3][2];
id(grid_power).publish_state(tmp_grid_power);
int32_t tmp_grid_power_rev = -tmp_grid_power;
id(grid_power_rev).publish_state(tmp_grid_power_rev);
int32_t tmp_threshold = id(threshold).state;
int32_t tmp_hysteresis = id(hysteresis).state;
int32_t tmp_set_power = id(set_power).state;
if (tmp_grid_power < tmp_threshold - tmp_hysteresis) {
tmp_set_power += abs(tmp_grid_power - tmp_threshold);
if (tmp_set_power < 0) {
tmp_set_power = 0;
}
if (id(auto_mode)) {
id(set_power).publish_state(tmp_set_power);
}
}
if (tmp_grid_power > tmp_threshold + tmp_hysteresis) {
tmp_set_power -= abs(tmp_grid_power - tmp_threshold);
if (tmp_set_power < 0) {
tmp_set_power = 0;
}
if (id(auto_mode)) {
id(set_power).publish_state(tmp_set_power);
}
}
}
});
switch:
- platform: template
name: "Auto Mode Switch"
id: auto_mode_switch
turn_on_action:
- globals.set:
id: auto_mode
value: 'true'
turn_off_action:
- globals.set:
id: auto_mode
value: 'false'
- number.set:
id: set_power
value: '0.0'
lambda: |-
return id(auto_mode);


I see you have installed Home Assistant.
To install ESPHome on a device using the ESPHome Dashboard, installed as a Home Assistant add-on.


For more information, please visit the official link: https://esphome.io/guides/getting_started_hassio
Other ways to install refer to the link:
https://esphome.io/guides/getting_started_command_line
https://esphome.io/guides/getting_started_hassio
https://esphome.io/guides/installing_esphome.html
Then re-download the firmware

copy the related configuration file is as follows: scr-485.yaml
select all
Paste
install
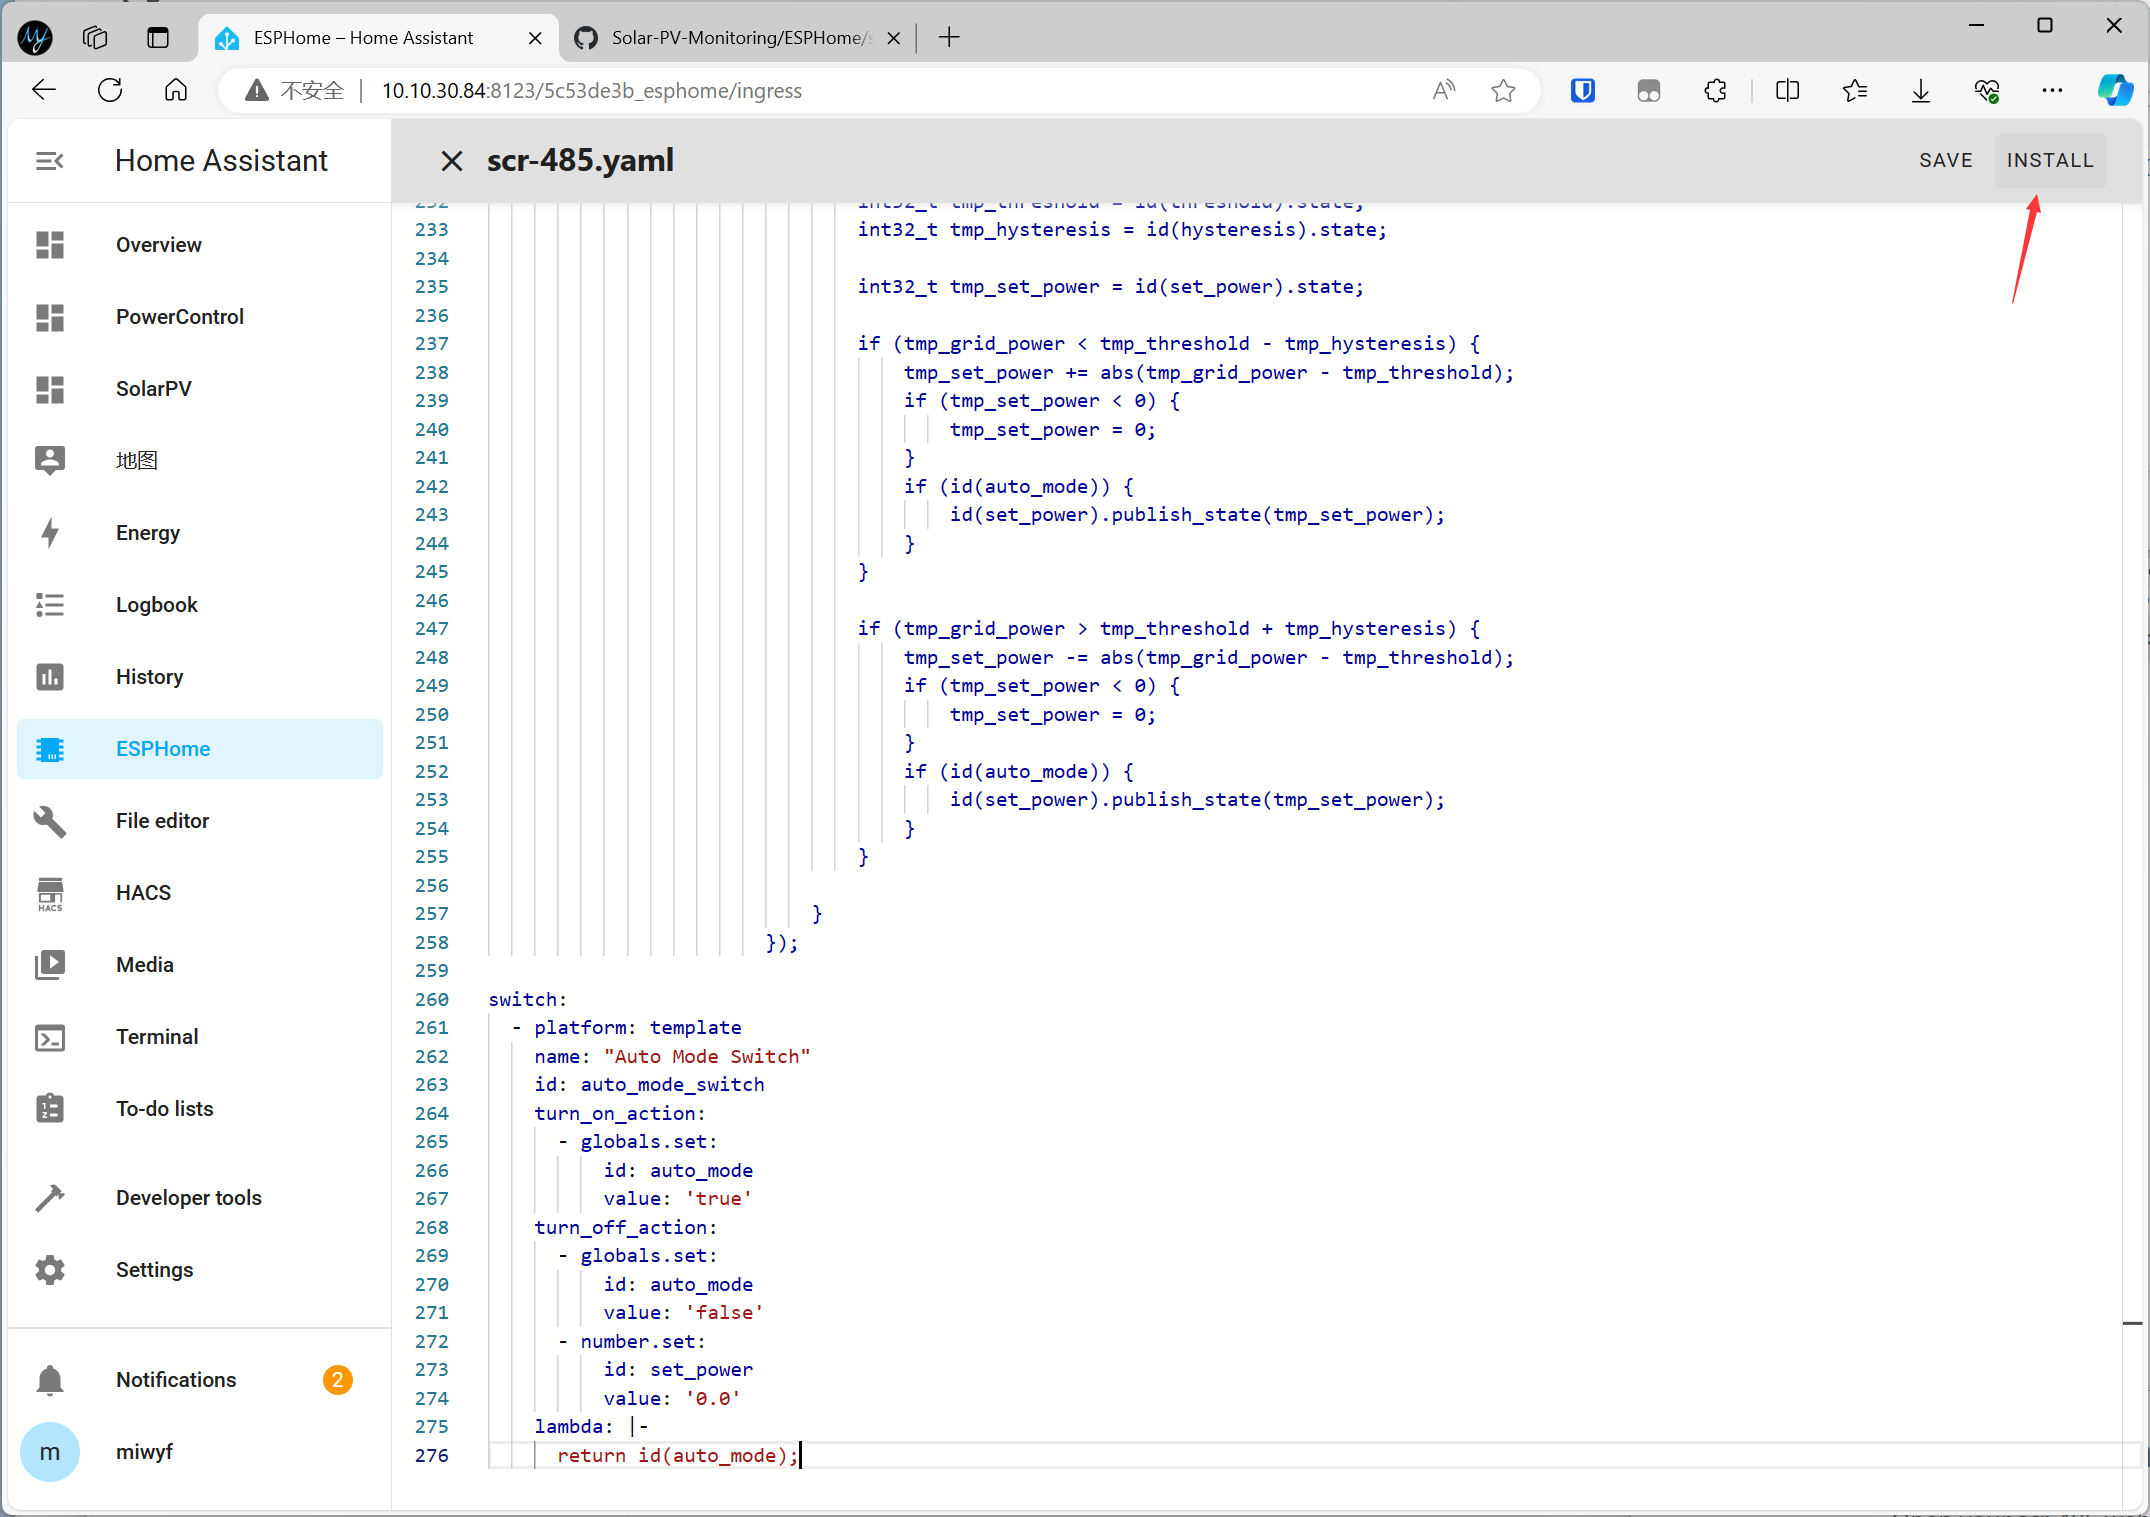
Wirelessly
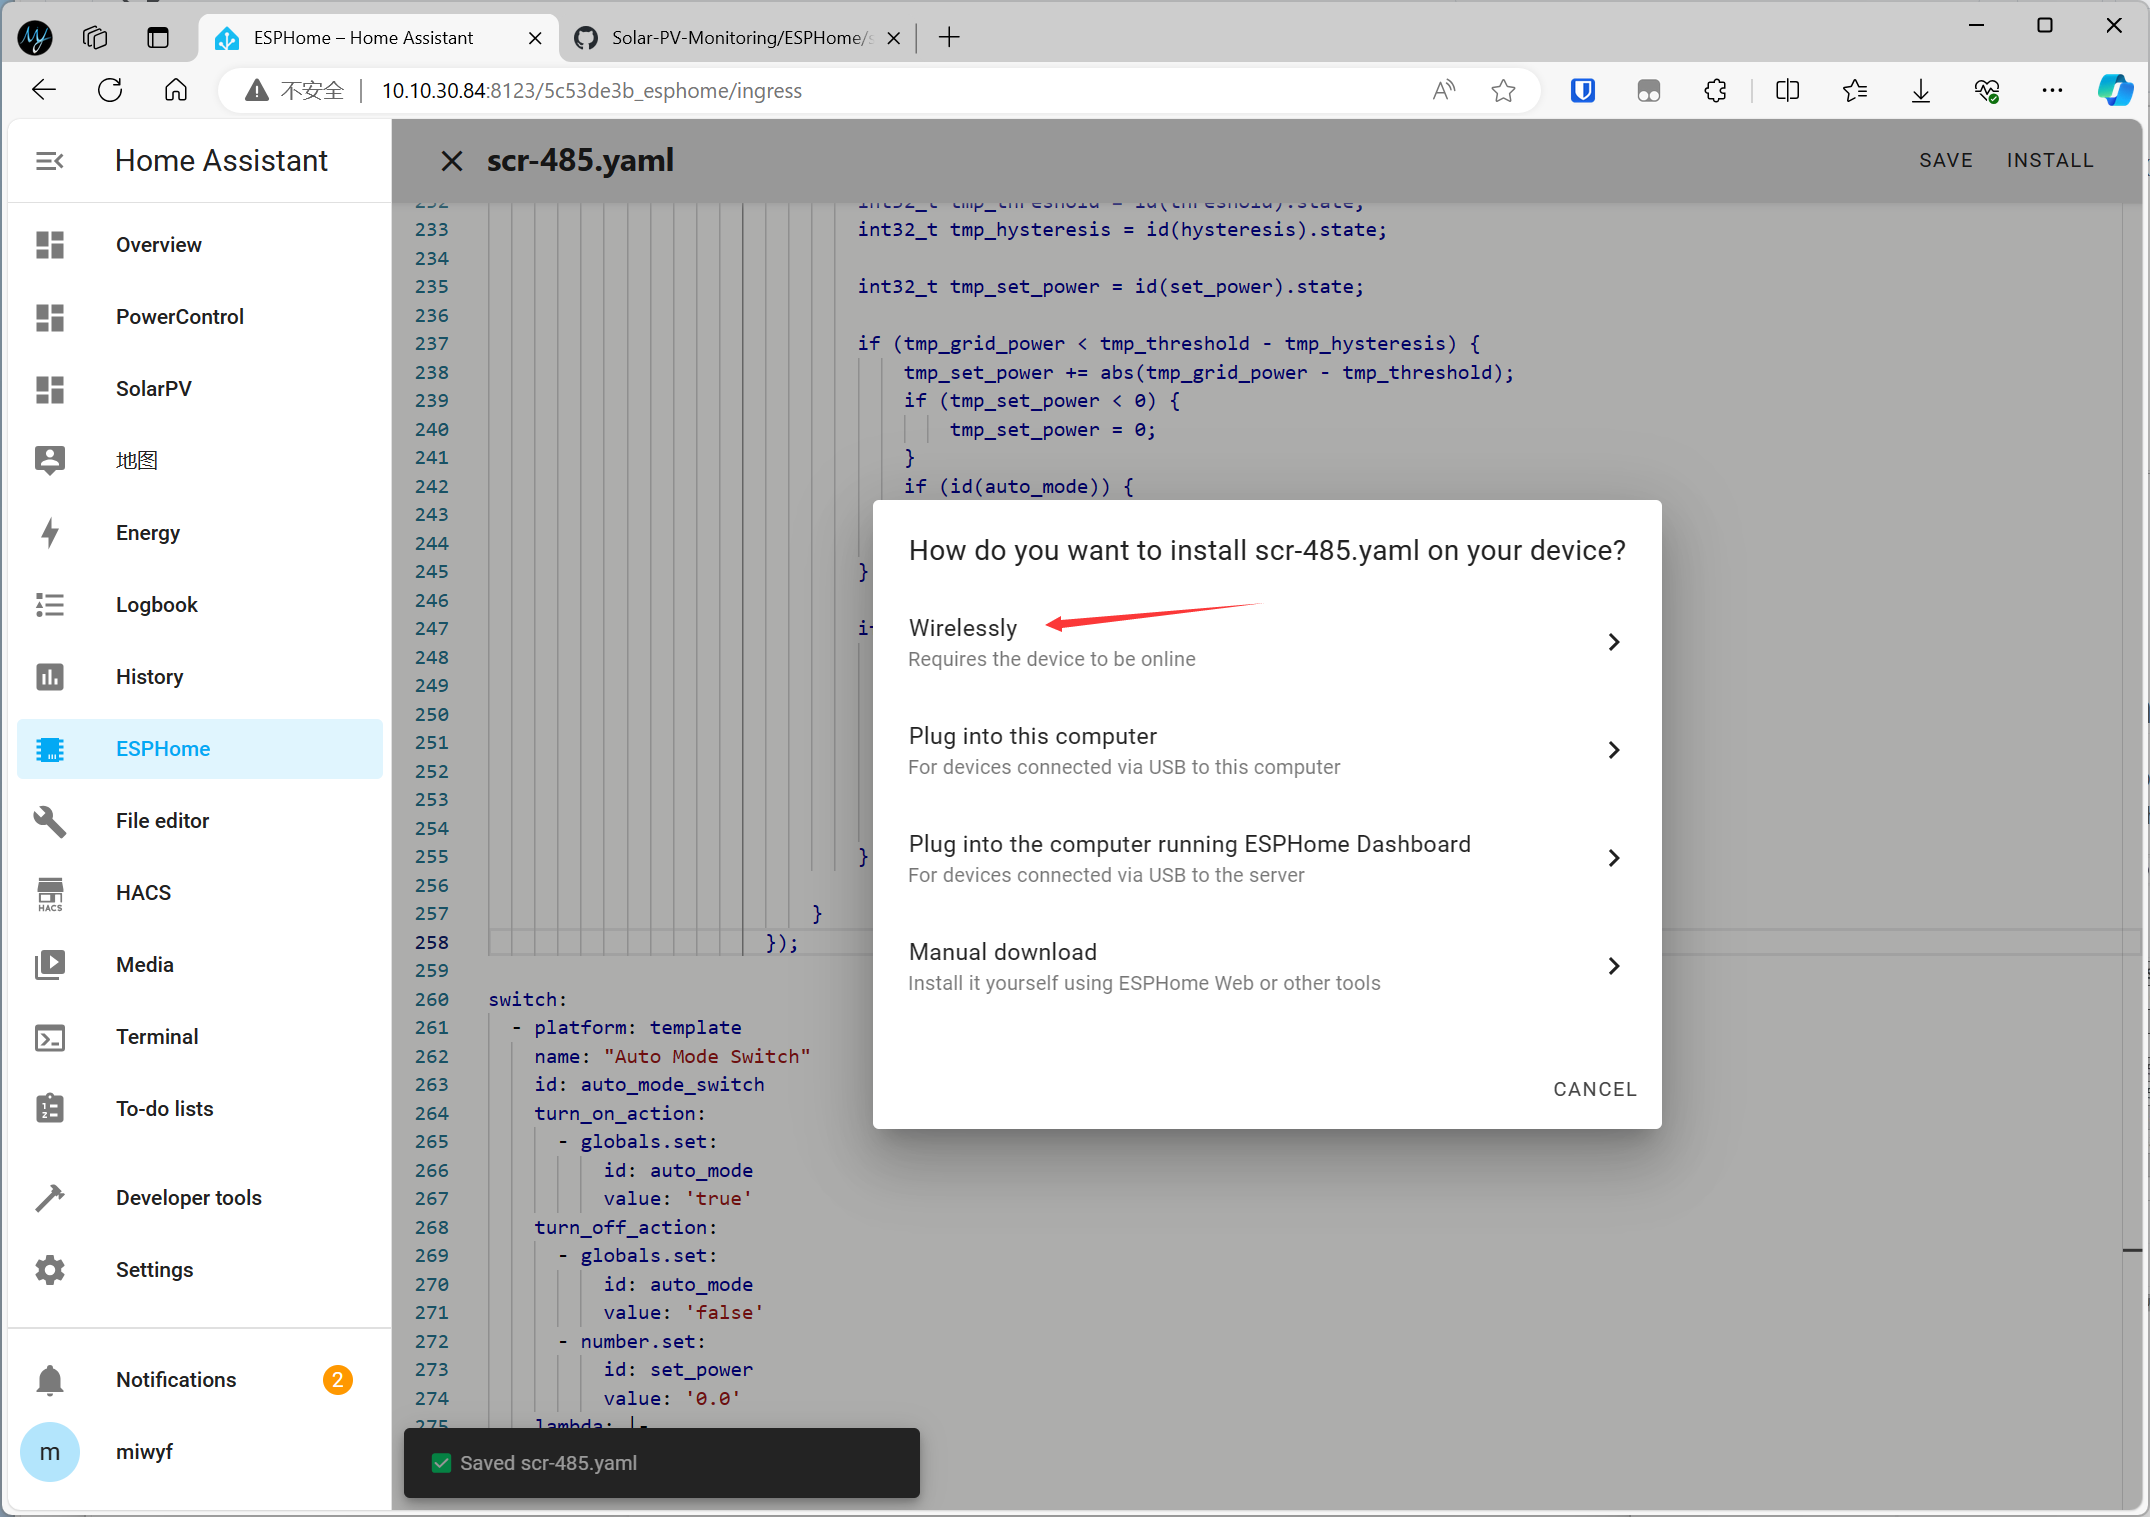
Wait for compilation to complete
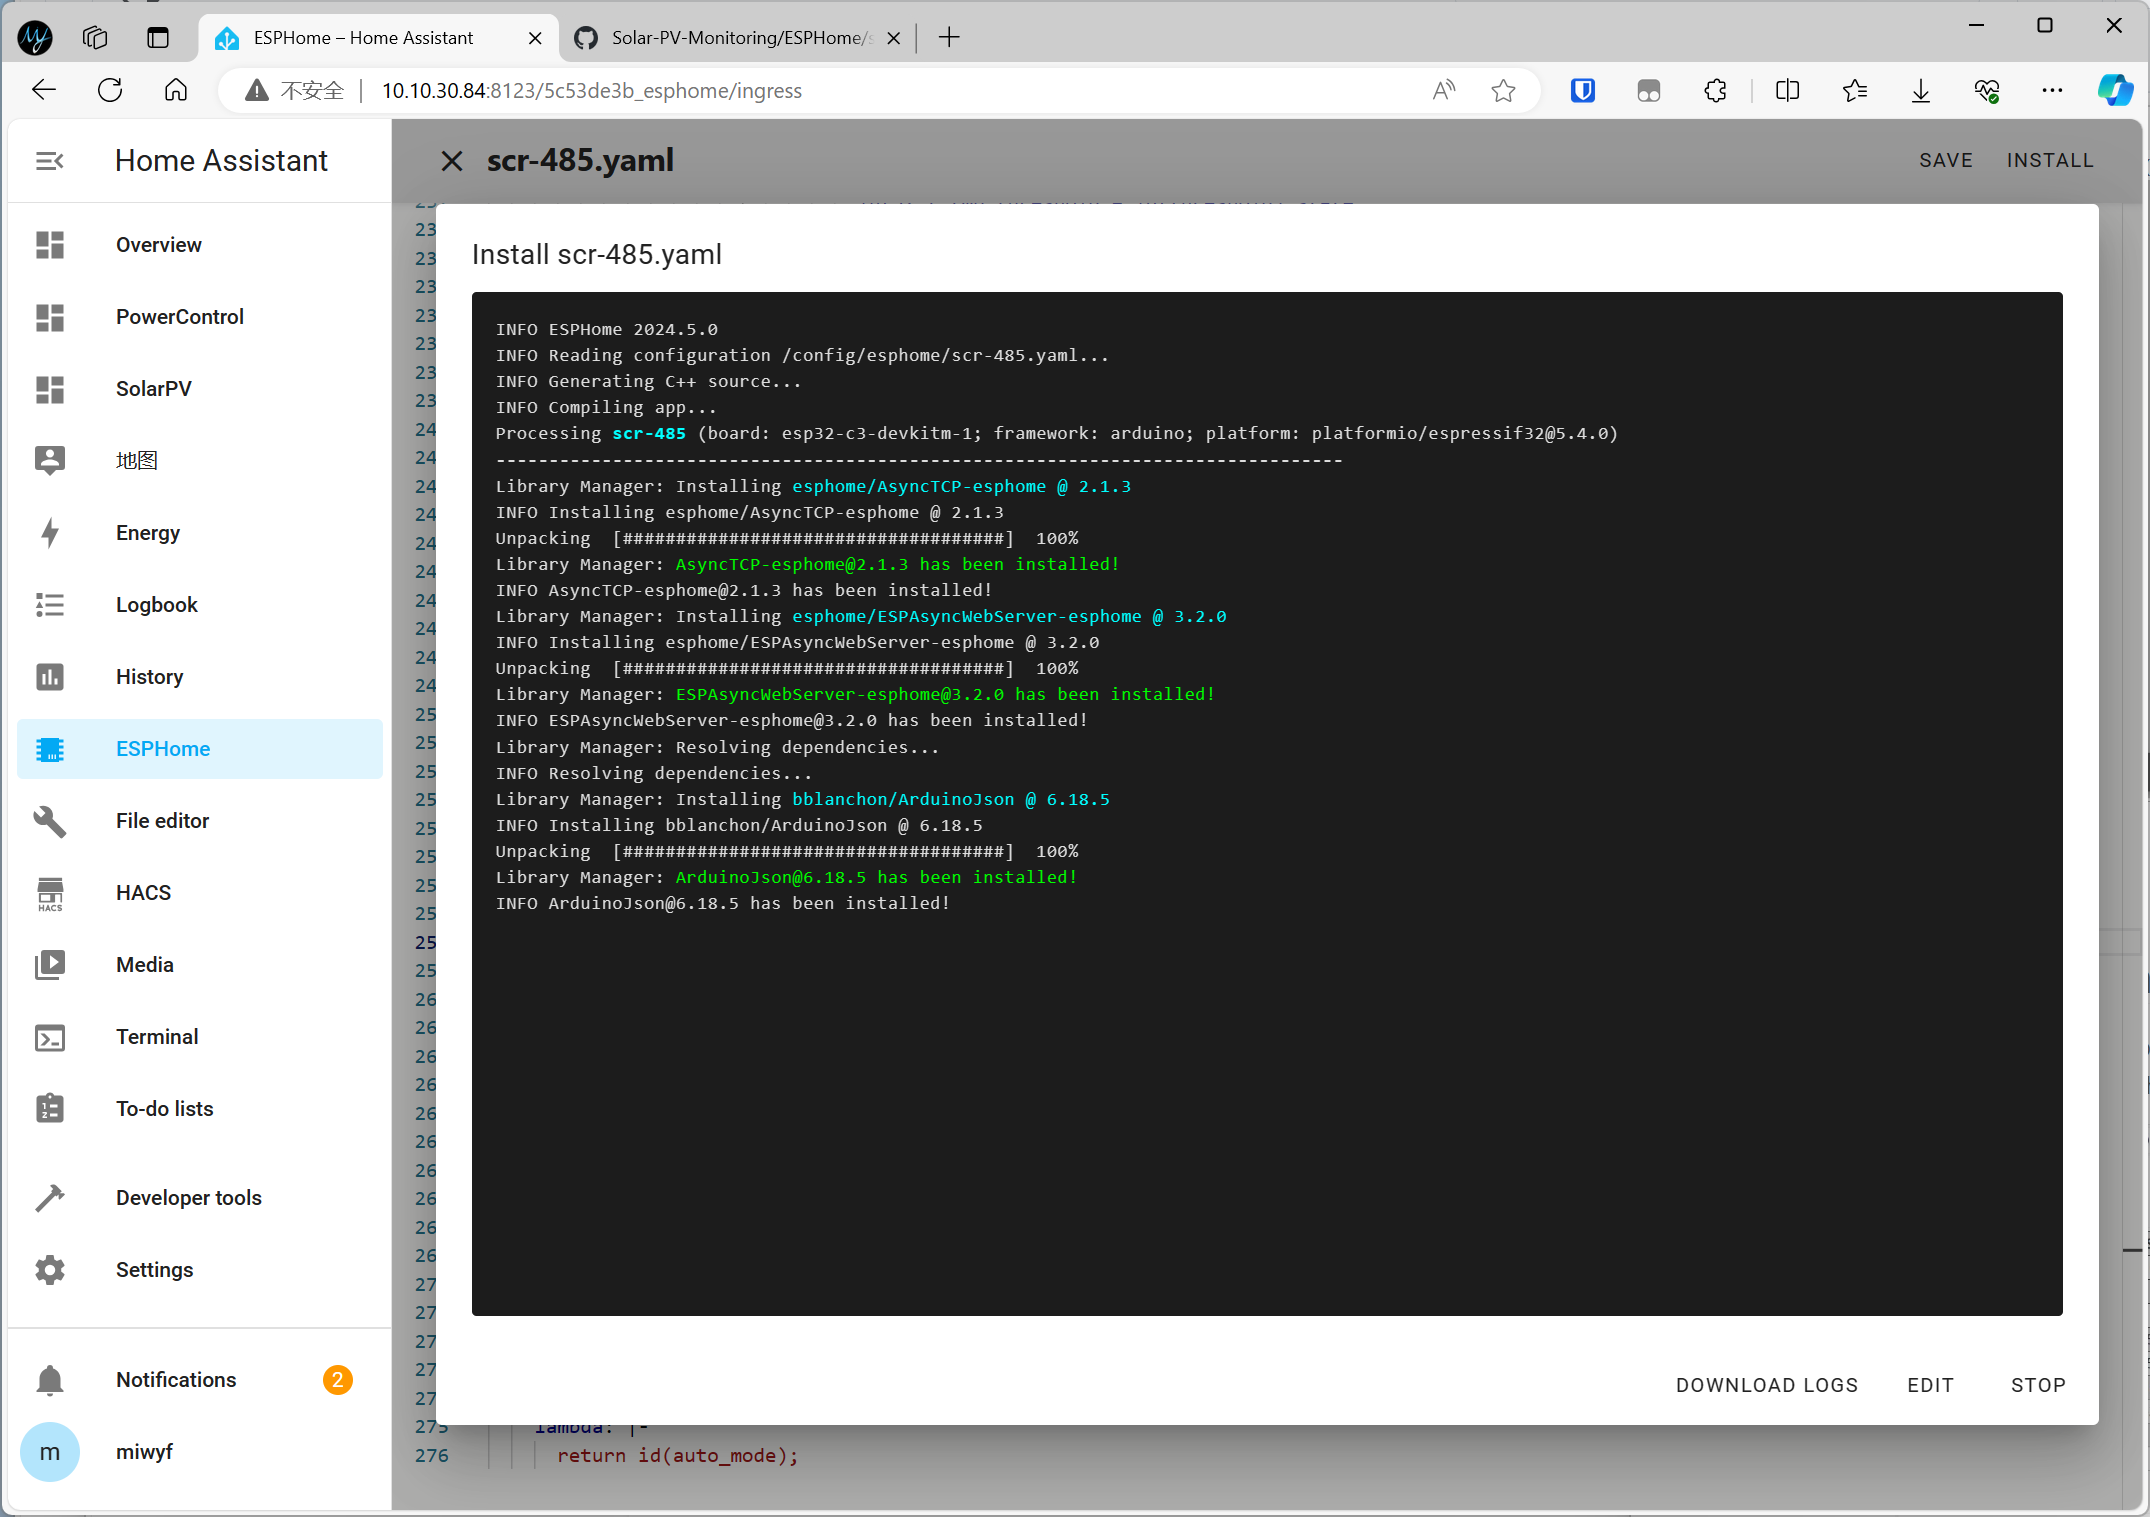
Compilation completed and firmware download in progress
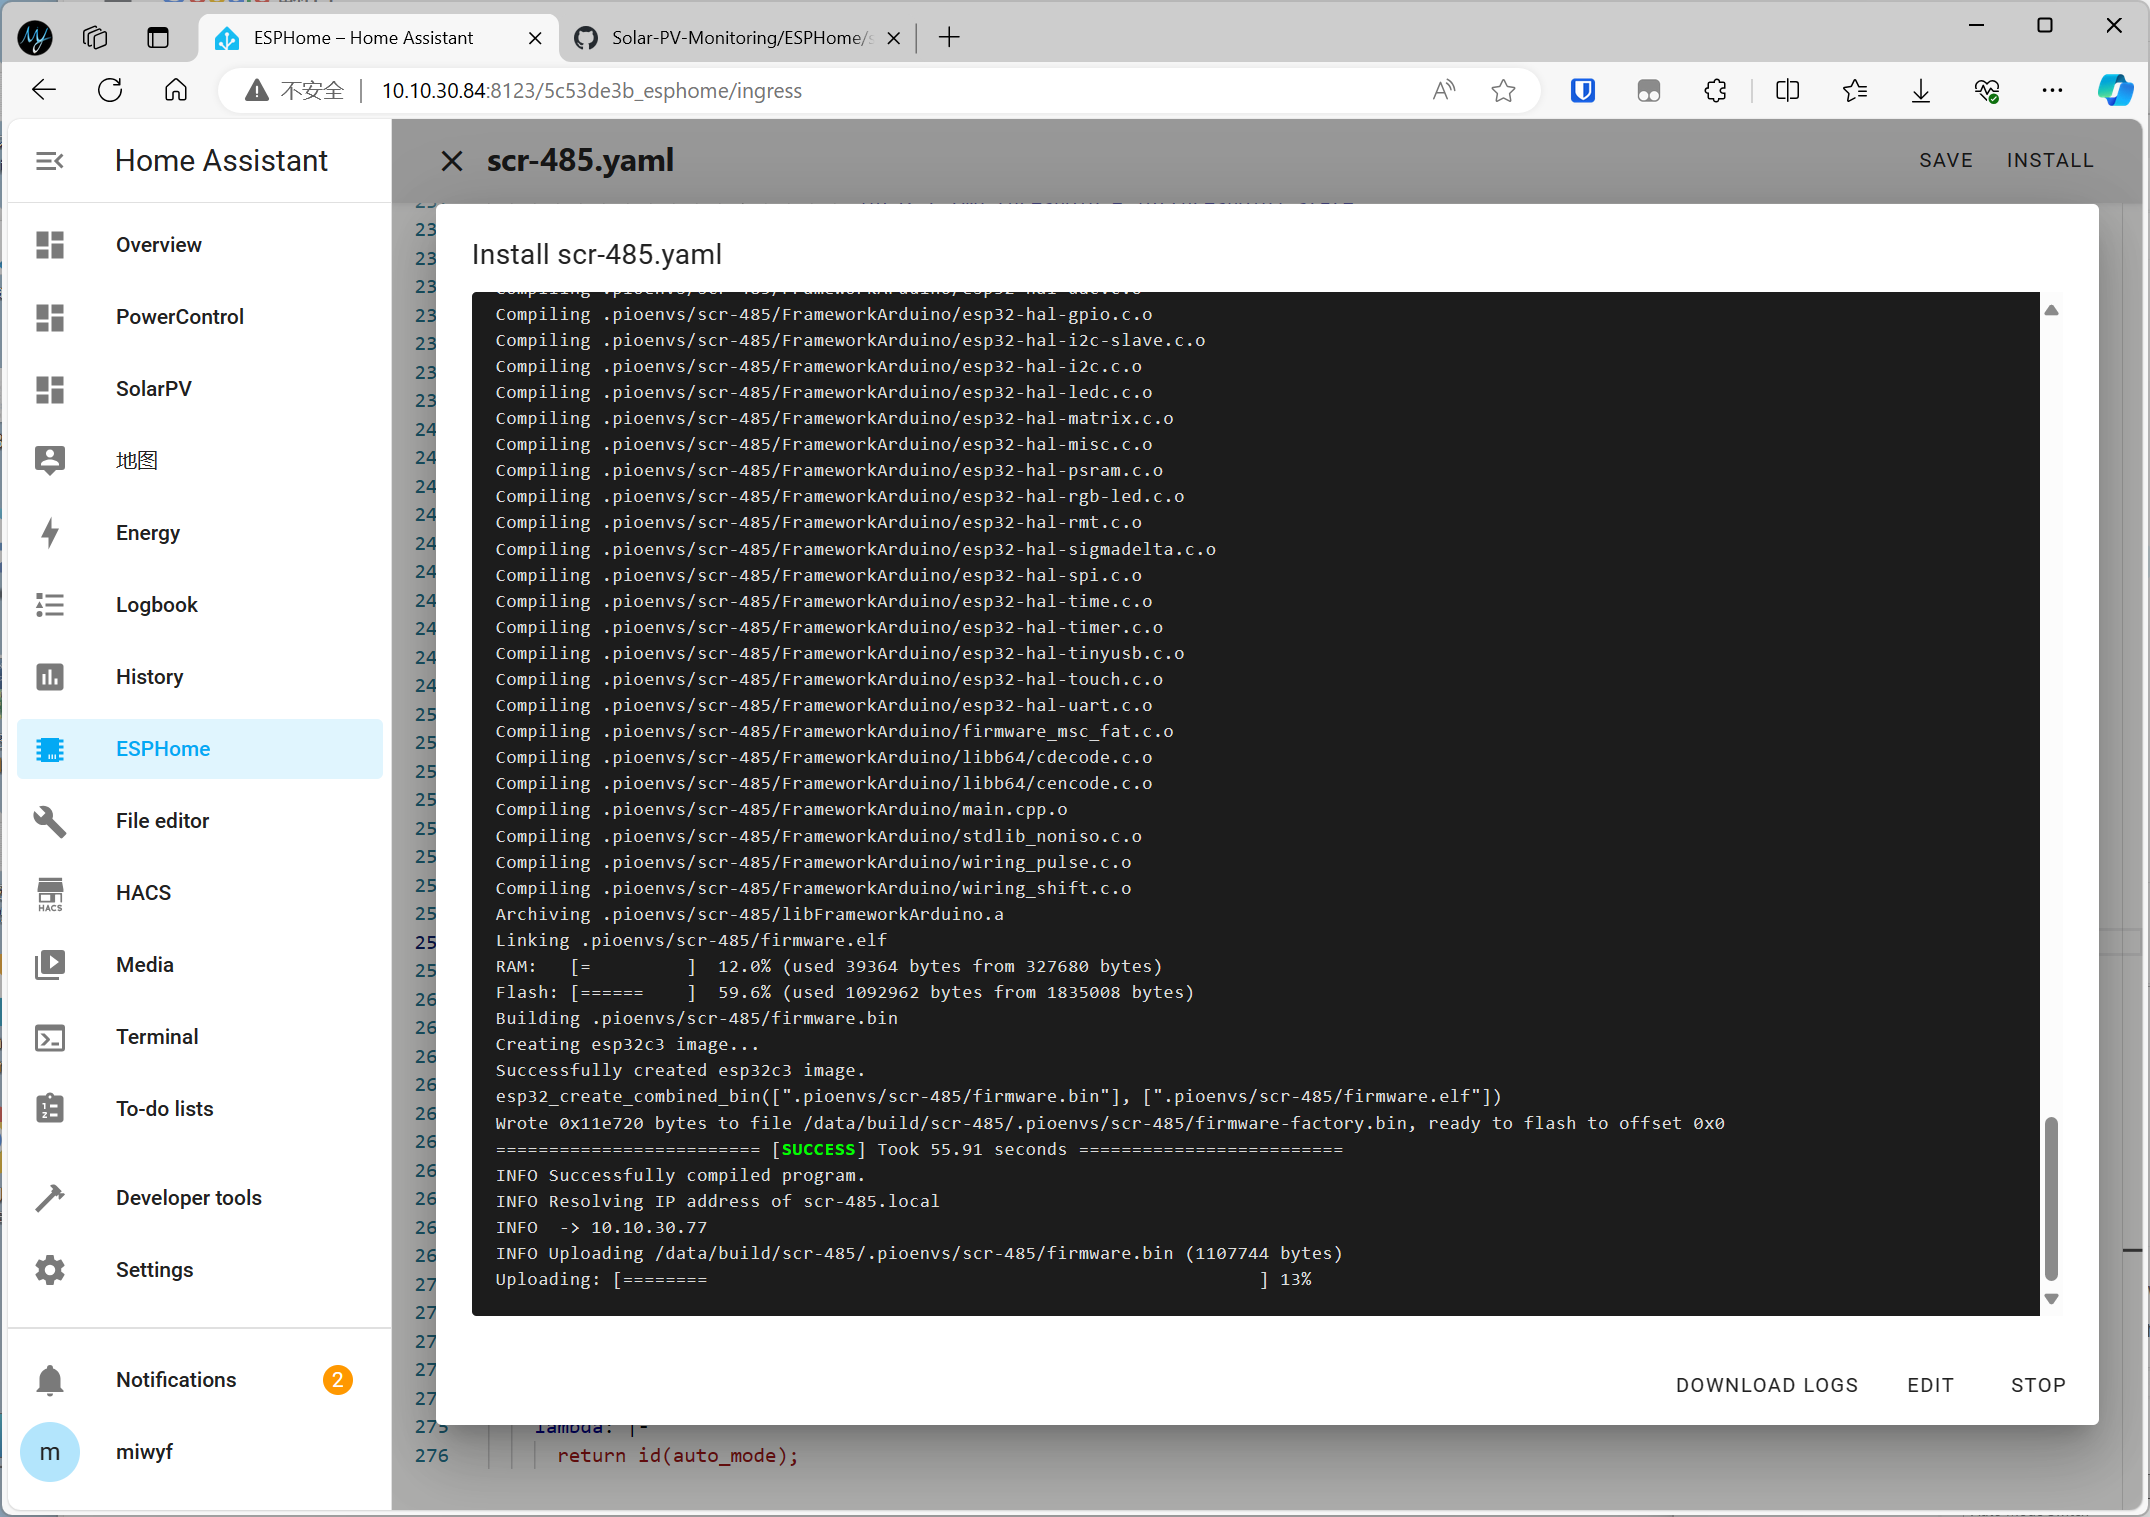
When the device is starting, you can see the device IP address or http://scr-485.local
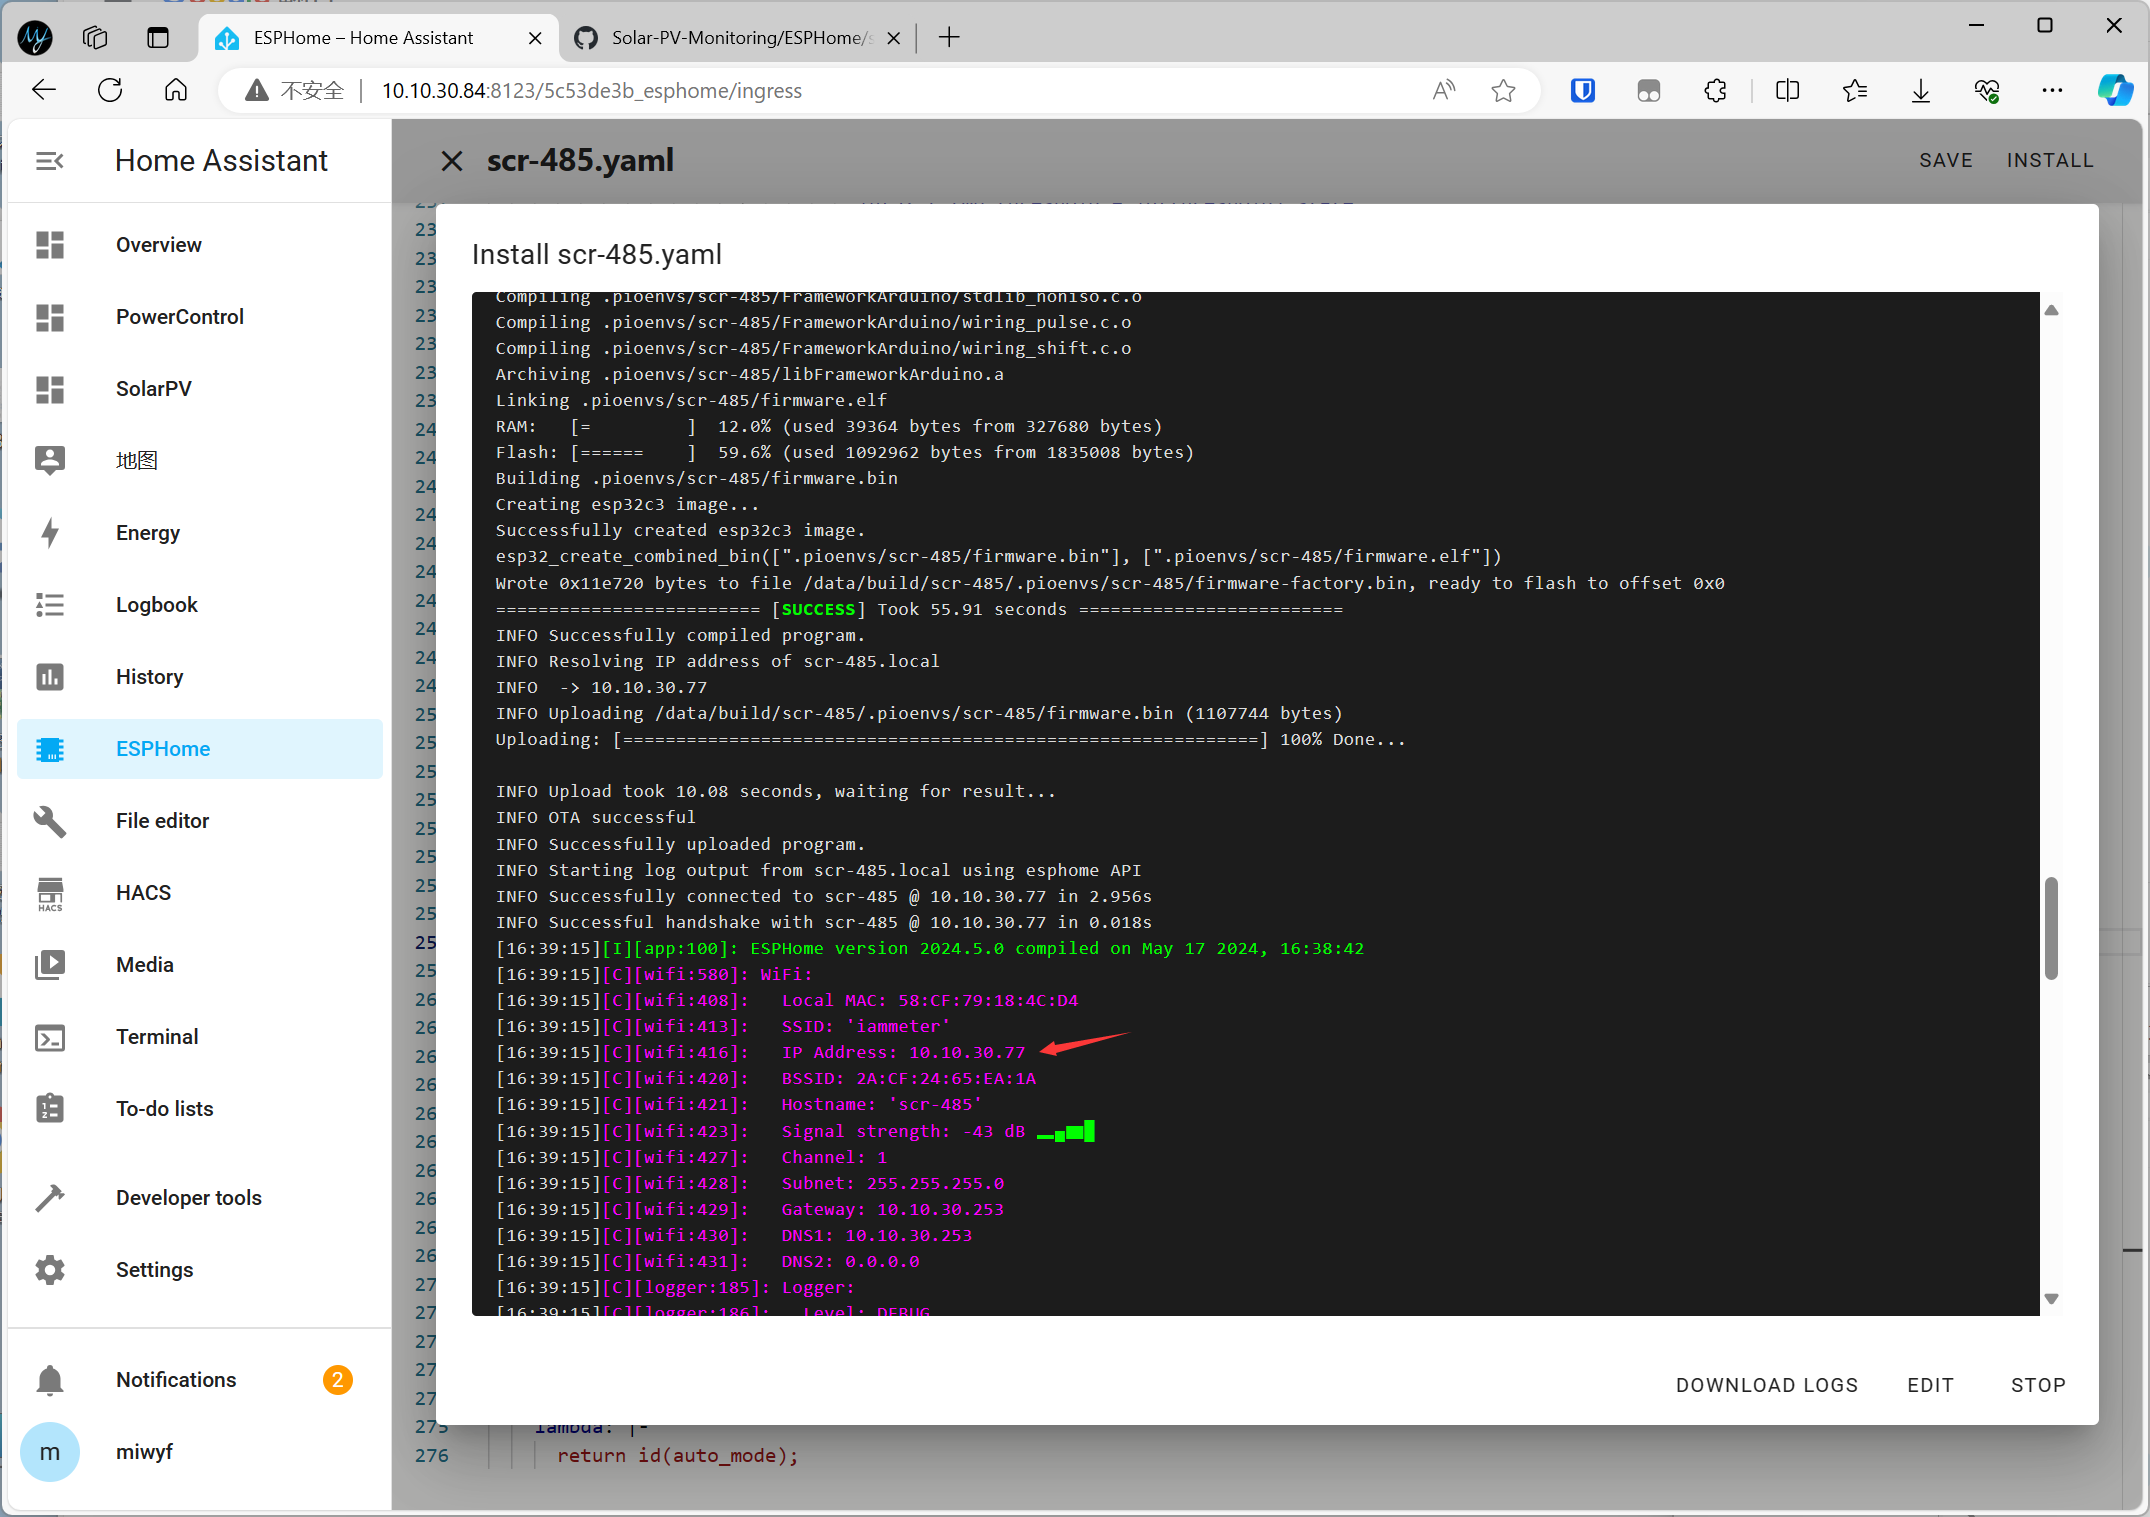

OK, that's all done and the update completed, took a little over 500 seconds.
I still can't get communication with the power meter, values returned are (NA) and in home assistant is 'unkown'
Here's the JSON from the meter's API
{"method":"uploadsn","mac":"B0F8932F6F33","version":"1.75.36","server":"em","SN":"REDACTED","Datas":[[246.5,6.44,-200,14862.849,36718.928,49.99,0.12],[247.1,2.53,-618,2843.490,25291.016,49.99,0.99],[249.9,4.38,-903,7304.766,27501.930,49.99,0.82],[0.0,0.00,-1721,1686.591,66220.639,49.99,0.82]]}Is there something else I'm missing?


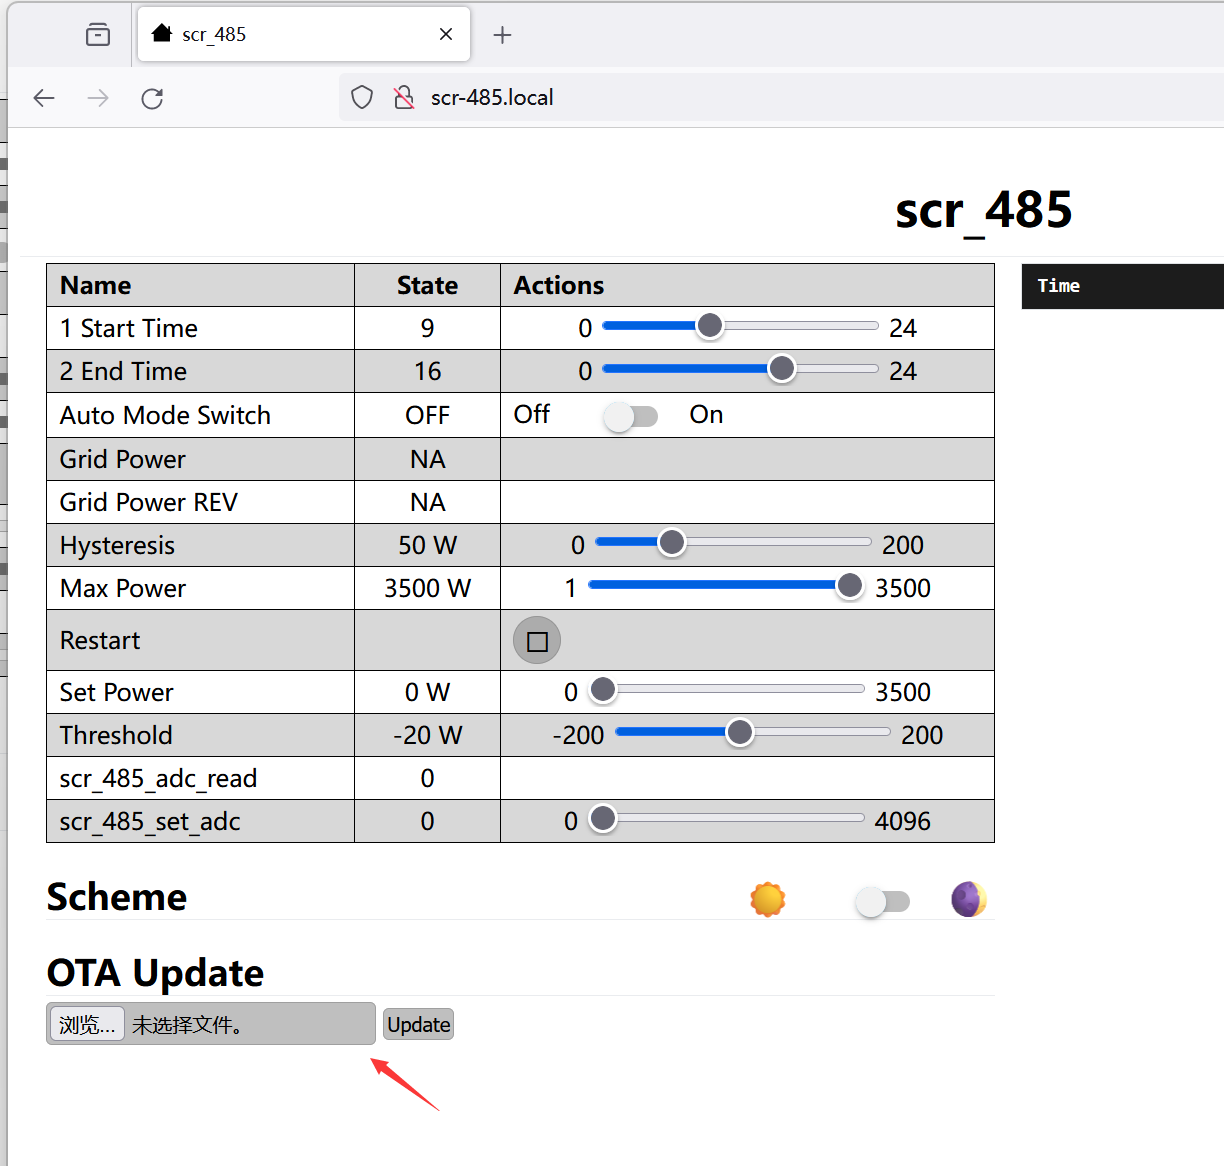
It's all working now, except for the above weird values.
It's reading the meter API correctly but the set power is crazy
1. you can change the interval 1s to 5s
interval:
- interval: 5s
.....
2. Put all:
if (tmp_set_power < 0) {
tmp_set_power = 0;
}
Change to:
if (tmp_set_power < 0) {
tmp_set_power = 0;
}
if (tmp_set_power > id(max_power).state) {
tmp_set_power = id(max_power).state;
}
Then you can change your Max Power to 3600:
- platform: template
id: max_power
name: "Max Power"
optimistic: true
min_value: 1
max_value: 3600
step: 1
initial_value: 3600
unit_of_measurement: "W"
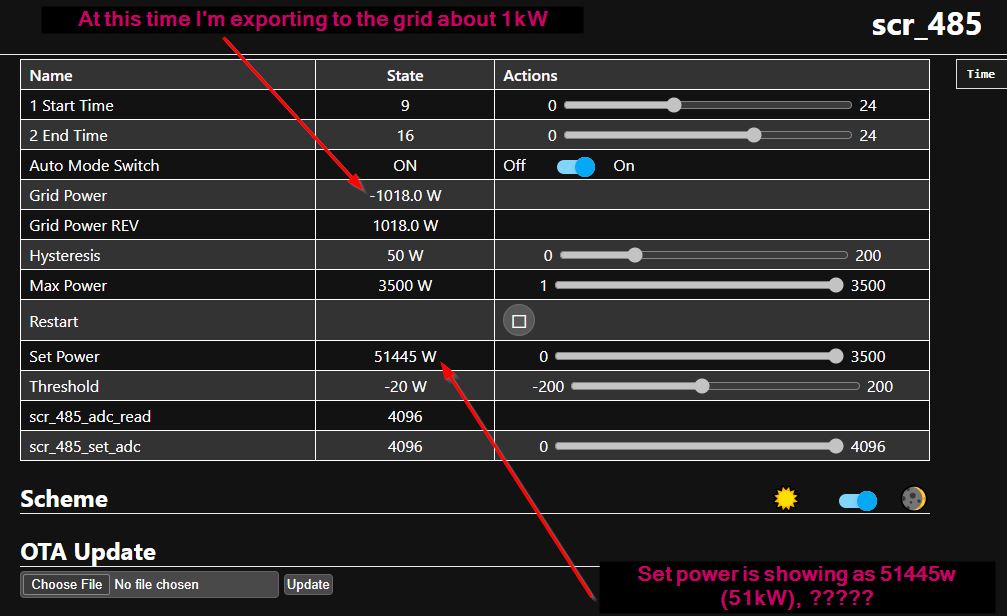
Cool, that's fixed the wild values, however it's still sitting at Max value which is 1000w more than the grid export value

You can continue to observe whether your power generation is much higher than 3500?
Or check whether your heating system is running in heating mode. Although SCR-485 gives a maximum power of 3500, is your heating system actually always working at 3500w?
yes, it's about 3450w. The element is rated 3.6kW but in reality it uses 3450 watts or so.
Bear in mind, that as I mention earlier I don't have any load on the device at the moment, will this have an impact on the calculated max power?
Yes, SCR-485 has an impact on the calculated maximum power, which ensures that you can fully utilize your photovoltaic power without drawing power from the grid.
You need to add a load to properly utilize your photovoltaic power. SCR-485 will adjust the maximum power of the load connected to it in real time according to your current grid power to ensure that the grid power is around -20W you set.
For sure, I understand the concept, I just wondered as I currently do not have the load connected if that will interfere with the results. I might connect a kettle and see what happens, the sun just went down here, so we'll see. I'll be connecting it to the HWS on Saturday (2 more days)
You can test the effect with a kettle.
Then remember to connect the fan next to it. If the control power is high, the fan needs to actively dissipate heat.
OK, some more infos
Hi.
I’ll just quickly give this info here and I can post it up if you like.
What I find is that the device reboots when it’s connected and trying to read
values from the WEM3080T API with auto mode switch turned on which resets it to
the initial values in the .yaml file. Which I am presuming happens if it tries to read the data and it either can't retrieve it through a network condition or receives data that is invalid. I can't test for this. I can say that home assistant reads my WEM3080T without issue
I have several access points here and this situation occurs whichever access point I connect the SCR485 to. Home assistant can continue to access the WEM3080T local API without interruption or issue.
If I turn off the
auto mode switch on the SCR485 then the device stays online. I can of course make the
set power follow the available power directly with a home assistant automation,
however for the purpose of testing this is not a solution at the present time.
I believe there needs to be a way for the SCR485 to catch a bad read from the
WEM3080T API so that it doesn’t crash the SCR485 device if it can’t get a suitable or valid value .
You can see below
the order of doing things while setting up. As soon as I connect to the WEM3080T API by
setting the IP address and the “Datas” location in the .yaml file it’s
continuously rebooting/resetting. Then when I turn the auto mode switch
to off so that it stops polling the local API the device is stable.

You can see that Home assistant has no breaks in the data from the same API source

Could the addition of this line have any benefit, so that if the API query doesn't return an integer it won't proceed on this particular cycle
OK, I'll have that shortly. In the meantime, I'm finding the set value doesn't follow grid flow very well for the short period of time I can get the device to stay online.
The excess solar needs to be down to around 150watts before the set power starts to drop. There's a math issue here somewhere
In actual use, please disable debug, because if debug is turned on with interval: 1s, a large amount of fast log data will be generated, which will cause the WiFi module to restart. At the same time, you can increase the interval time appropriately, such as 3s, to reduce the load of the WiFi module and see if it will restart frequently. In addition, I am still testing the data problem you mentioned.
Hmm, OK the issues with power calculation might be caused by my Tesla Powerwall. I can see that while I'm exporting and I turn on the kettle, the power available to export drops to zero (Kettle is 2kW), and then the battery provides the extra 1 kW, so the grid flow show about '0', so as far as the scr485 is concerned it's doing it's job and negating grid flow, hence it holds the power value at full.
Edit: Update
Indeed, when I turn my Tesla Powerwall off, the power calculations and device runs as expected except for the dropouts.
so it seems with a house battery, this device need some extra code perhaps.
I have a WEM3070 on that circuit too
[14:12:07][W][component:237]: Component interval took a long time for an operation (103 ms).
[14:12:07][W][component:238]: Components should block for at most 30 ms.
When I enabled the logging, it recompiled and it's been more stable since. The calculation issue is caused by the house battery (POWERWALL)
[14:11:42][D][http_request:099]: HTTP Request completed; URL: http://192.168.1.244/monitorjson; Code: 200; Duration: 214 ms
[14:11:42][W][component:237]: Component interval took a long time for an operation (264 ms).
[14:11:42][W][component:238]: Components should block for at most 30 ms.
[14:11:42][D][number:012]: 'scr_485_set_adc': Sending state 4096.000000
[14:11:42][D][modbus_controller.sensor:025]: Sensor new state: 4096.00
[14:11:42][D][sensor:094]: 'scr_485_adc_read': Sending state 4096.00000 with 0 decimals of accuracy
[14:11:42][D][modbus.number:023]: Number new state : 4096.00
[14:11:42][D][number:012]: 'scr_485_set_adc': Sending state 4096.000000
[14:11:43][D][modbus_controller.sensor:025]: Sensor new state: 4096.00
[14:11:43][D][sensor:094]: 'scr_485_adc_read': Sending state 4096.00000 with 0 decimals of accuracy
[14:11:43][D][modbus.number:023]: Number new state : 4096.00
[14:11:43][D][number:012]: 'scr_485_set_adc': Sending state 4096.000000
[14:11:44][D][modbus_controller.sensor:025]: Sensor new state: 4096.00
[14:11:44][D][sensor:094]: 'scr_485_adc_read': Sending state 4096.00000 with 0 decimals of accuracy
[14:11:44][D][modbus.number:023]: Number new state : 4096.00
[14:11:44][D][number:012]: 'scr_485_set_adc': Sending state 4096.000000
[14:11:45][D][modbus_controller.sensor:025]: Sensor new state: 4096.00
[14:11:45][D][sensor:094]: 'scr_485_adc_read': Sending state 4096.00000 with 0 decimals of accuracy
[14:11:45][D][modbus.number:023]: Number new state : 4096.00
[14:11:45][D][number:012]: 'scr_485_set_adc': Sending state 4096.000000
[14:11:46][D][modbus_controller.sensor:025]: Sensor new state: 4096.00
[14:11:46][D][sensor:094]: 'scr_485_adc_read': Sending state 4096.00000 with 0 decimals of accuracy
[14:11:46][D][modbus.number:023]: Number new state : 4096.00
[14:11:46][D][number:012]: 'scr_485_set_adc': Sending state 4096.000000
[14:11:49][D][main:218]: Response status: 200, Duration: 2567 ms
[14:11:49][D][sensor:094]: 'Grid Power': Sending state -1632.00000 W with 1 decimals of accuracy
[14:11:49][D][sensor:094]: 'Grid Power REV': Sending state 1632.00000 W with 1 decimals of accuracy
[14:11:49][D][number:012]: 'Set Power': Sending state 3500.000000
[14:11:49][D][number:054]: 'scr_485_set_adc' - Setting number value
[14:11:49][D][number:113]: New number value: 4096.000000
[14:11:49][D][modbus.number:061]: Updating register: connected Sensor=scr_485_set_adc start address=0x1 register count=1 new value=4096.00 (val=4096.00)
[14:11:49][D][number:012]: 'scr_485_set_adc': Sending state 4096.000000
[14:11:49][D][http_request:099]: HTTP Request completed; URL: http://192.168.1.244/monitorjson; Code: 200; Duration: 2567 ms
[14:11:49][W][component:237]: Component interval took a long time for an operation (2603 ms).
[14:11:49][W][component:238]: Components should block for at most 30 ms.
[14:11:49][D][number:012]: 'scr_485_set_adc': Sending state 4096.000000
[14:11:49][D][modbus_controller.sensor:025]: Sensor new state: 4096.00
[14:11:49][D][sensor:094]: 'scr_485_adc_read': Sending state 4096.00000 with 0 decimals of accuracy
[14:11:49][D][modbus.number:023]: Number new state : 4096.00
[14:11:49][D][number:012]: 'scr_485_set_adc': Sending state 4096.000000
[14:11:50][D][modbus_controller.sensor:025]: Sensor new state: 4096.00
[14:11:50][D][sensor:094]: 'scr_485_adc_read': Sending state 4096.00000 with 0 decimals of accuracy
[14:11:50][D][modbus.number:023]: Number new state : 4096.00
[14:11:50][D][number:012]: 'scr_485_set_adc': Sending state 4096.000000
[14:11:51][D][modbus_controller.sensor:025]: Sensor new state: 4096.00
[14:11:51][D][sensor:094]: 'scr_485_adc_read': Sending state 4096.00000 with 0 decimals of accuracy
[14:11:51][D][modbus.number:023]: Number new state : 4096.00
[14:11:51][D][number:012]: 'scr_485_set_adc': Sending state 4096.000000
[14:11:53][D][main:218]: Response status: 200, Duration: 1323 ms
[14:11:53][D][sensor:094]: 'Grid Power': Sending state -1632.00000 W with 1 decimals of accuracy
[14:11:53][D][sensor:094]: 'Grid Power REV': Sending state 1632.00000 W with 1 decimals of accuracy
[14:11:53][D][number:012]: 'Set Power': Sending state 3500.000000
[14:11:53][D][number:054]: 'scr_485_set_adc' - Setting number value
[14:11:53][D][number:113]: New number value: 4096.000000
[14:11:53][D][modbus.number:061]: Updating register: connected Sensor=scr_485_set_adc start address=0x1 register count=1 new value=4096.00 (val=4096.00)
[14:11:53][D][number:012]: 'scr_485_set_adc': Sending state 4096.000000
[14:11:53][D][http_request:099]: HTTP Request completed; URL: http://192.168.1.244/monitorjson; Code: 200; Duration: 1323 ms
[14:11:53][W][component:237]: Component interval took a long time for an operation (1374 ms).
[14:11:53][W][component:238]: Components should block for at most 30 ms.
[14:11:53][D][number:012]: 'scr_485_set_adc': Sending state 4096.000000
[14:11:53][D][modbus_controller.sensor:025]: Sensor new state: 4096.00
[14:11:53][D][sensor:094]: 'scr_485_adc_read': Sending state 4096.00000 with 0 decimals of accuracy
[14:11:53][D][modbus.number:023]: Number new state : 4096.00
[14:11:53][D][number:012]: 'scr_485_set_adc': Sending state 4096.000000
[14:11:54][D][modbus_controller.sensor:025]: Sensor new state: 4096.00
[14:11:54][D][sensor:094]: 'scr_485_adc_read': Sending state 4096.00000 with 0 decimals of accuracy
[14:11:54][D][modbus.number:023]: Number new state : 4096.00
[14:11:54][D][number:012]: 'scr_485_set_adc': Sending state 4096.000000
[14:11:55][D][modbus_controller.sensor:025]: Sensor new state: 4096.00
[14:11:55][D][sensor:094]: 'scr_485_adc_read': Sending state 4096.00000 with 0 decimals of accuracy
[14:11:55][D][modbus.number:023]: Number new state : 4096.00
[14:11:55][D][number:012]: 'scr_485_set_adc': Sending state 4096.000000
[14:11:56][D][modbus_controller.sensor:025]: Sensor new state: 4096.00
[14:11:56][D][sensor:094]: 'scr_485_adc_read': Sending state 4096.00000 with 0 decimals of accuracy
[14:11:56][D][modbus.number:023]: Number new state : 4096.00
[14:11:56][D][number:012]: 'scr_485_set_adc': Sending state 4096.000000
[14:11:57][D][main:218]: Response status: 200, Duration: 168 ms
[14:11:57][D][sensor:094]: 'Grid Power': Sending state -1630.00000 W with 1 decimals of accuracy
[14:11:57][D][sensor:094]: 'Grid Power REV': Sending state 1630.00000 W with 1 decimals of accuracy
[14:11:57][D][number:012]: 'Set Power': Sending state 3500.000000
[14:11:57][D][number:054]: 'scr_485_set_adc' - Setting number value
[14:11:57][D][number:113]: New number value: 4096.000000
[14:11:57][D][modbus.number:061]: Updating register: connected Sensor=scr_485_set_adc start address=0x1 register count=1 new value=4096.00 (val=4096.00)
[14:11:57][D][number:012]: 'scr_485_set_adc': Sending state 4096.000000
[14:11:57][D][http_request:099]: HTTP Request completed; URL: http://192.168.1.244/monitorjson; Code: 200; Duration: 168 ms
[14:11:57][W][component:237]: Component interval took a long time for an operation (221 ms).
[14:11:57][W][component:238]: Components should block for at most 30 ms.
[14:11:57][D][number:012]: 'scr_485_set_adc': Sending state 4096.000000
[14:11:57][D][modbus_controller.sensor:025]: Sensor new state: 4096.00
[14:11:57][D][sensor:094]: 'scr_485_adc_read': Sending state 4096.00000 with 0 decimals of accuracy
[14:11:57][D][modbus.number:023]: Number new state : 4096.00
[14:11:57][D][number:012]: 'scr_485_set_adc': Sending state 4096.000000
[14:11:58][D][modbus_controller.sensor:025]: Sensor new state: 4096.00
[14:11:58][D][sensor:094]: 'scr_485_adc_read': Sending state 4096.00000 with 0 decimals of accuracy
[14:11:58][D][modbus.number:023]: Number new state : 4096.00
[14:11:58][D][number:012]: 'scr_485_set_adc': Sending state 4096.000000
[14:11:59][D][modbus_controller.sensor:025]: Sensor new state: 4096.00
[14:11:59][D][sensor:094]: 'scr_485_adc_read': Sending state 4096.00000 with 0 decimals of accuracy
[14:11:59][D][modbus.number:023]: Number new state : 4096.00
[14:11:59][D][number:012]: 'scr_485_set_adc': Sending state 4096.000000
[14:12:00][D][modbus_controller.sensor:025]: Sensor new state: 4096.00
[14:12:00][D][sensor:094]: 'scr_485_adc_read': Sending state 4096.00000 with 0 decimals of accuracy
[14:12:00][D][modbus.number:023]: Number new state : 4096.00
[14:12:00][D][number:012]: 'scr_485_set_adc': Sending state 4096.000000
[14:12:01][D][modbus_controller.sensor:025]: Sensor new state: 4096.00
[14:12:01][D][sensor:094]: 'scr_485_adc_read': Sending state 4096.00000 with 0 decimals of accuracy
[14:12:01][D][modbus.number:023]: Number new state : 4096.00
[14:12:01][D][number:012]: 'scr_485_set_adc': Sending state 4096.000000
[14:12:01][D][main:218]: Response status: 200, Duration: 57 ms
[14:12:01][D][sensor:094]: 'Grid Power': Sending state -1666.00000 W with 1 decimals of accuracy
[14:12:01][D][sensor:094]: 'Grid Power REV': Sending state 1666.00000 W with 1 decimals of accuracy
[14:12:01][D][number:012]: 'Set Power': Sending state 3500.000000
[14:12:01][D][number:054]: 'scr_485_set_adc' - Setting number value
[14:12:01][D][number:113]: New number value: 4096.000000
[14:12:02][D][modbus.number:061]: Updating register: connected Sensor=scr_485_set_adc start address=0x1 register count=1 new value=4096.00 (val=4096.00)
[14:12:02][D][number:012]: 'scr_485_set_adc': Sending state 4096.000000
[14:12:02][D][http_request:099]: HTTP Request completed; URL: http://192.168.1.244/monitorjson; Code: 200; Duration: 57 ms
[14:12:02][W][component:237]: Component interval took a long time for an operation (110 ms).
[14:12:02][W][component:238]: Components should block for at most 30 ms.
[14:12:02][D][number:012]: 'scr_485_set_adc': Sending state 4096.000000
[14:12:02][D][modbus_controller.sensor:025]: Sensor new state: 4096.00
[14:12:02][D][sensor:094]: 'scr_485_adc_read': Sending state 4096.00000 with 0 decimals of accuracy
[14:12:02][D][modbus.number:023]: Number new state : 4096.00
[14:12:02][D][number:012]: 'scr_485_set_adc': Sending state 4096.000000
[14:12:03][D][modbus_controller.sensor:025]: Sensor new state: 4096.00
[14:12:03][D][sensor:094]: 'scr_485_adc_read': Sending state 4096.00000 with 0 decimals of accuracy
[14:12:03][D][modbus.number:023]: Number new state : 4096.00
[14:12:03][D][number:012]: 'scr_485_set_adc': Sending state 4096.000000
[14:12:04][D][modbus_controller.sensor:025]: Sensor new state: 4096.00
[14:12:04][D][sensor:094]: 'scr_485_adc_read': Sending state 4096.00000 with 0 decimals of accuracy
[14:12:04][D][modbus.number:023]: Number new state : 4096.00
[14:12:04][D][number:012]: 'scr_485_set_adc': Sending state 4096.000000
[14:12:05][D][modbus_controller.sensor:025]: Sensor new state: 4096.00
[14:12:05][D][sensor:094]: 'scr_485_adc_read': Sending state 4096.00000 with 0 decimals of accuracy
[14:12:05][D][modbus.number:023]: Number new state : 4096.00
[14:12:05][D][number:012]: 'scr_485_set_adc': Sending state 4096.000000
[14:12:06][D][modbus_controller.sensor:025]: Sensor new state: 4096.00
[14:12:06][D][sensor:094]: 'scr_485_adc_read': Sending state 4096.00000 with 0 decimals of accuracy
[14:12:06][D][modbus.number:023]: Number new state : 4096.00
[14:12:06][D][number:012]: 'scr_485_set_adc': Sending state 4096.000000
[14:12:06][D][main:218]: Response status: 200, Duration: 51 ms
[14:12:06][D][sensor:094]: 'Grid Power': Sending state -1667.00000 W with 1 decimals of accuracy
[14:12:06][D][sensor:094]: 'Grid Power REV': Sending state 1667.00000 W with 1 decimals of accuracy
[14:12:06][D][number:012]: 'Set Power': Sending state 3500.000000
[14:12:06][D][number:054]: 'scr_485_set_adc' - Setting number value
[14:12:06][D][number:113]: New number value: 4096.000000
[14:12:06][D][modbus.number:061]: Updating register: connected Sensor=scr_485_set_adc start address=0x1 register count=1 new value=4096.00 (val=4096.00)
[14:12:06][D][number:012]: 'scr_485_set_adc': Sending state 4096.000000
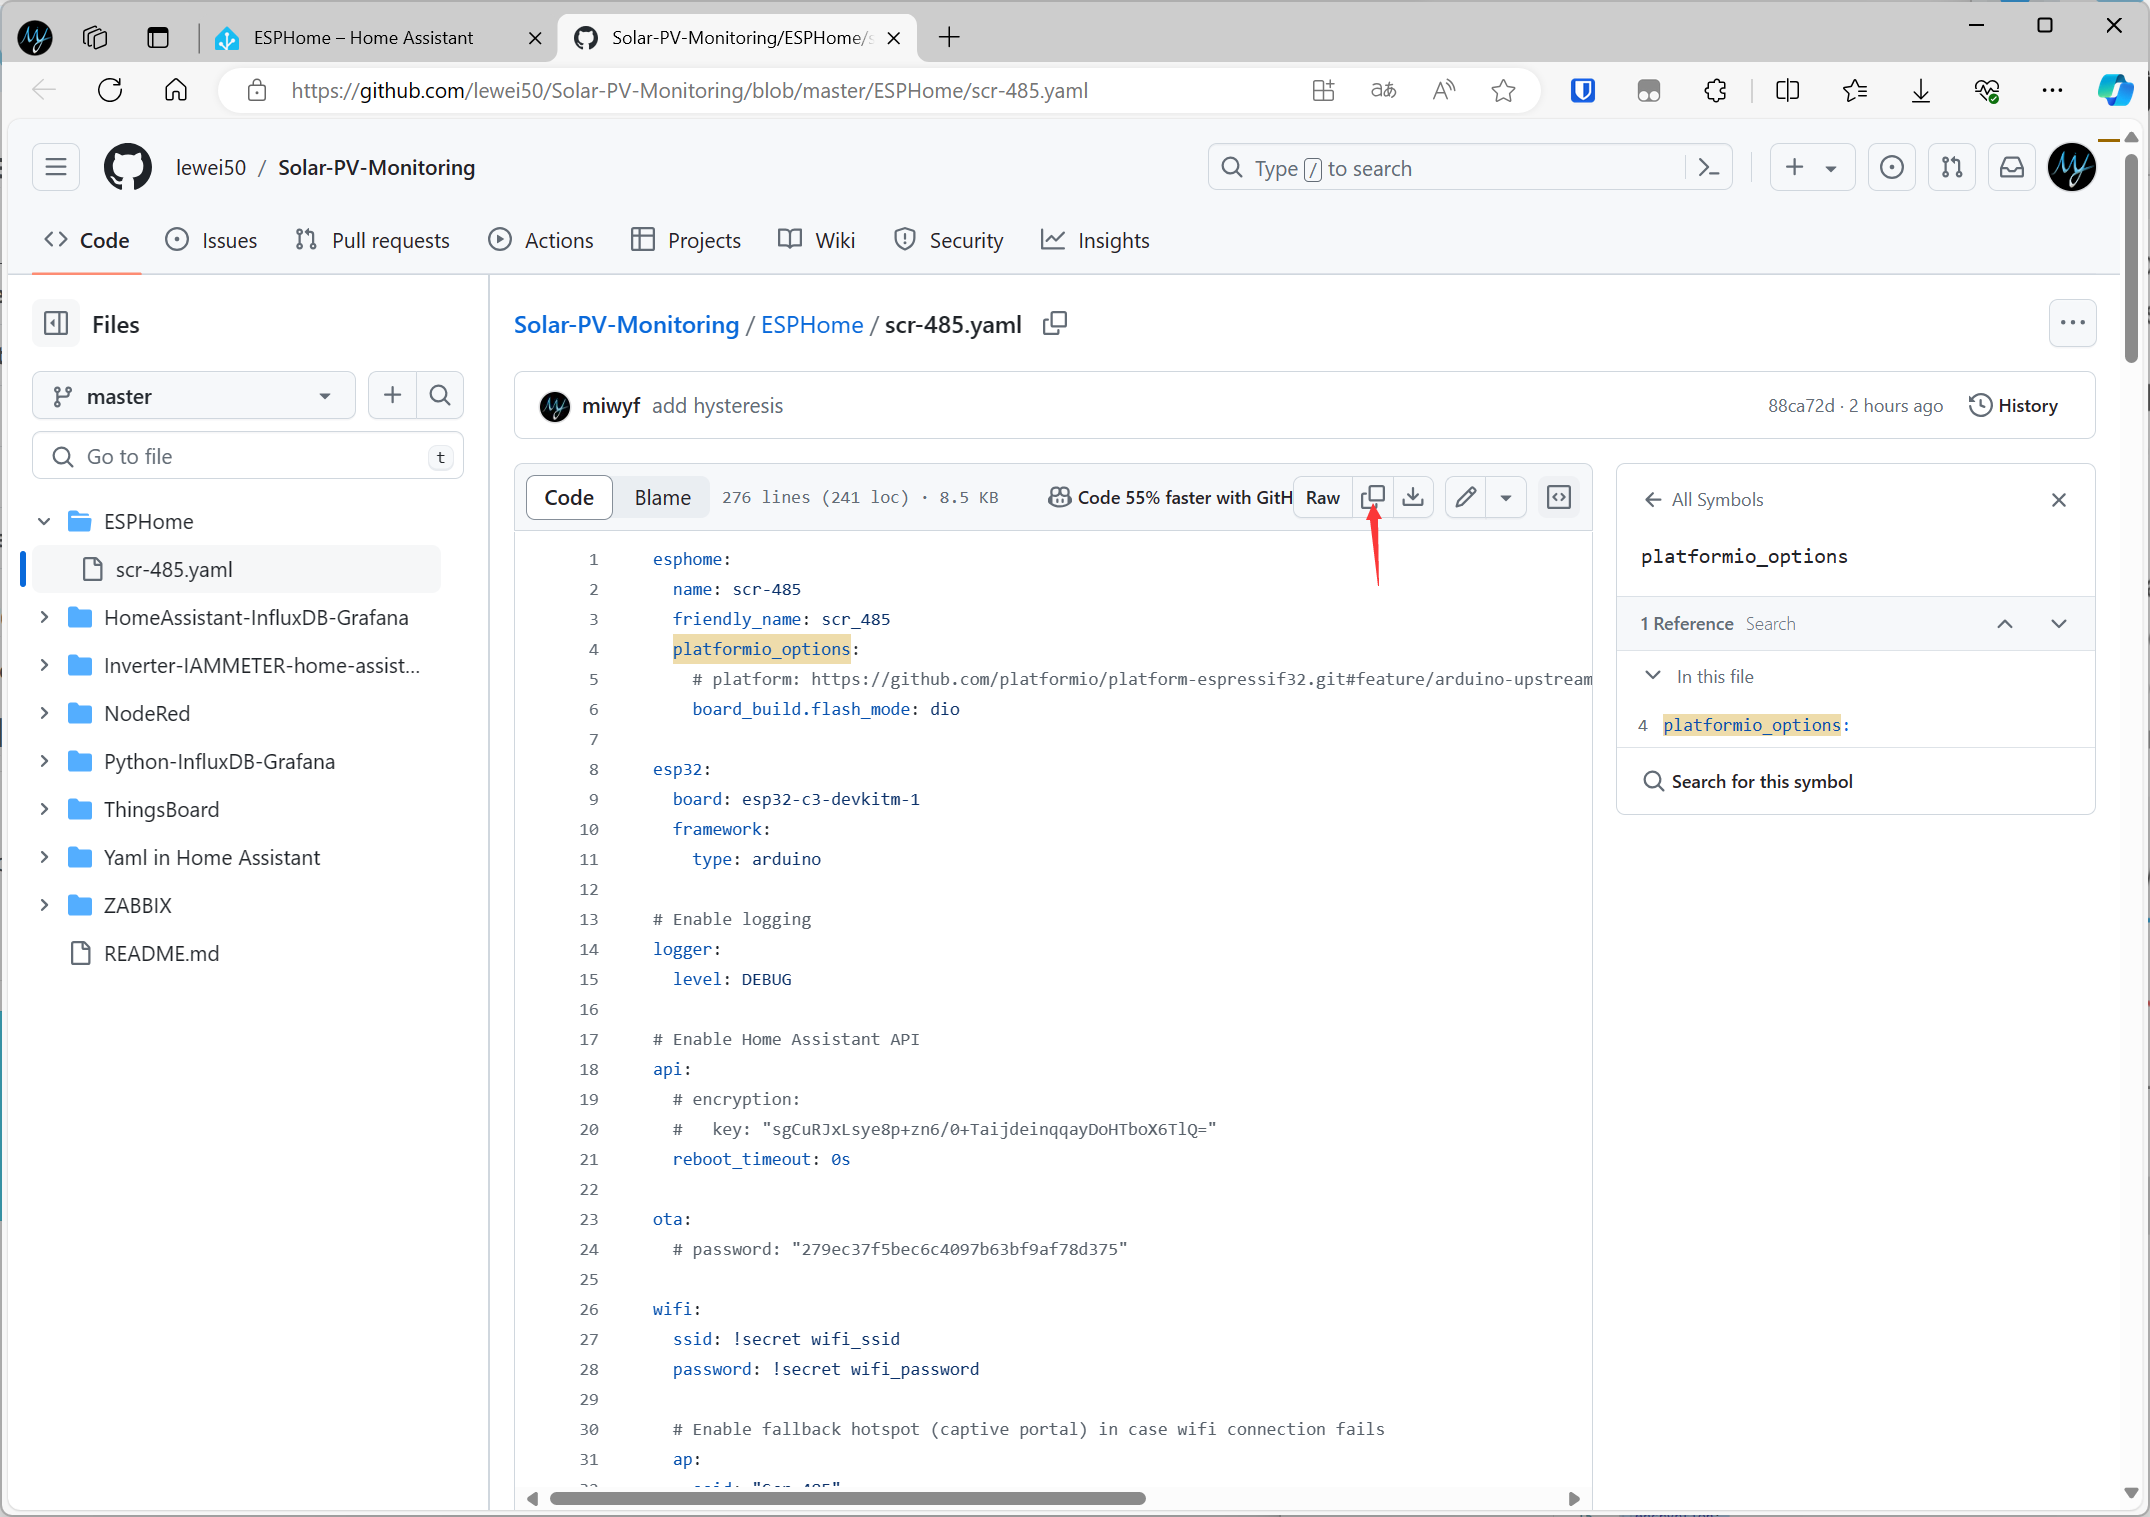
https://github.com/lewei50/Solar-PV-Monitoring/blob/master/ESPHome/scr-485.yaml
add restore_value: True for max_power/threshold/hysteresis/set_power/auto_start_time/auto_end_time
chg interval: 3s
This can greatly reduce the problem of restarting
OK great, I think we are all resolved.
The last remaining issue is the controlling of the power with a home battery on the premises, especially if you try and operate the SCR-485 when the battery is full, because the battery feeds the load and distorts the natural grid flow, resulting in the SCR-485 remaining at 100 prcent which essentially means that it's like not having it there because it won't function.
If I turn my battery off, (or lock it at 100% if it's charged) basically isolating it from participating, then everything works as intended.
Can you suggest any code that can query an additional WEM3080 that I have on the AC cable that connects the battery?
In my case, the WEM3080 is at IP http://192.168.1.243, the "Data" value is [2] or from my Home assistant yaml "{{ value_json.Data[2] }}"
There needs to be additional variable(s) and some math to add/subtract the battery watts.
The battery meter API registers a number below zero if discharging.
Many thanks for your ongoing support(s)
Are you saying the battery power comes from value_json.Data[2] }}? Can you tell me the specific calculation formula or judgment conditions?
Hi. yes the API's IP (http://192.168.1.243) is a WEM3080 and it (value_json.Data[2]) supplies the wattage in negative or positive (bidirectional as you know) with negative values indicating the battery is discharging to cover loads. I think the issue stems from the fact the battery's response to demand from loads practically instant, but the APIs can only respond with data as per being polled at multi-second intervals so that lag time makes it difficult for it to keep up. If these 2 APIs could be polled simultaneously and the math applied within the calculations, a good result should be achieved
I already have some sensors in home assistant to work out spare power for turning on other devices if there's enough power available, in fact I do this already for hot water. Here's the value templates from my home assistant configuration.yaml with the calculations I use.
Spare_power description
Takes the values from the iammeter API for grid flow and subtracts the value being reported by the WEM3080 battery meter's API. For my use, I then divide by 1000 to make kW and subtract 1kW to give me a 1kW headroom. These last 2 steps are not necessary for this purpose I suppose
Spare_power_real description
filters out negative values from "spare_power" and returns '0', because no power available needs to be just '0'
Does help with context?
spare_power:
friendly_name: Spare Solar Power
value_template: "{{(((0 - states('input_number.iammeter_api_grid_corrected') | float - states('sensor.iammeter_api_battery') | float ) / 1000) | float - 1 ) | round(2) }}"
device_class: power
unit_of_measurement: kW
spare_power_real:
friendly_name: "Absolute Spare Power Available"
value_template: >-
{% if states('sensor.spare_power') | float(0) > 0 %}
{{ states('sensor.spare_power') | float | round(1) }}
{% else %}
0
{% endif %}
unit_of_measurement: "kW"
If this is not practical to do, do not fear I can turn off the auto mode function and drive the value of power directly with a home assistant automation, however I felt you might want to look at this as many installations moving forward will have batteries at the home/workplace. If we're testing this, might as well see if there can be a baked in solution 🙂
For the time being perhaps I'll write a Home Assistant automation to directly write the scr_485_set_power number sensor and I'll let you know what calculations work best.
Work is ongoing, each modification requires waiting a day to test (during battery charging, while charged, when discharging). Modifying to fix one issue creates another, but I think I'm making progress.
The below link shows the Hot Water following the available spare power from solar, the calculation considers how much of the power going into the battery from solar can be diverted to hot water. Updates to various sensors can occur at different intervals/times which makes it a bit tricky, but some moderate success during the charge cycle today.
https://www.youtube.com/watch?v=c1Ojv2fXNxw
Hi Greg:
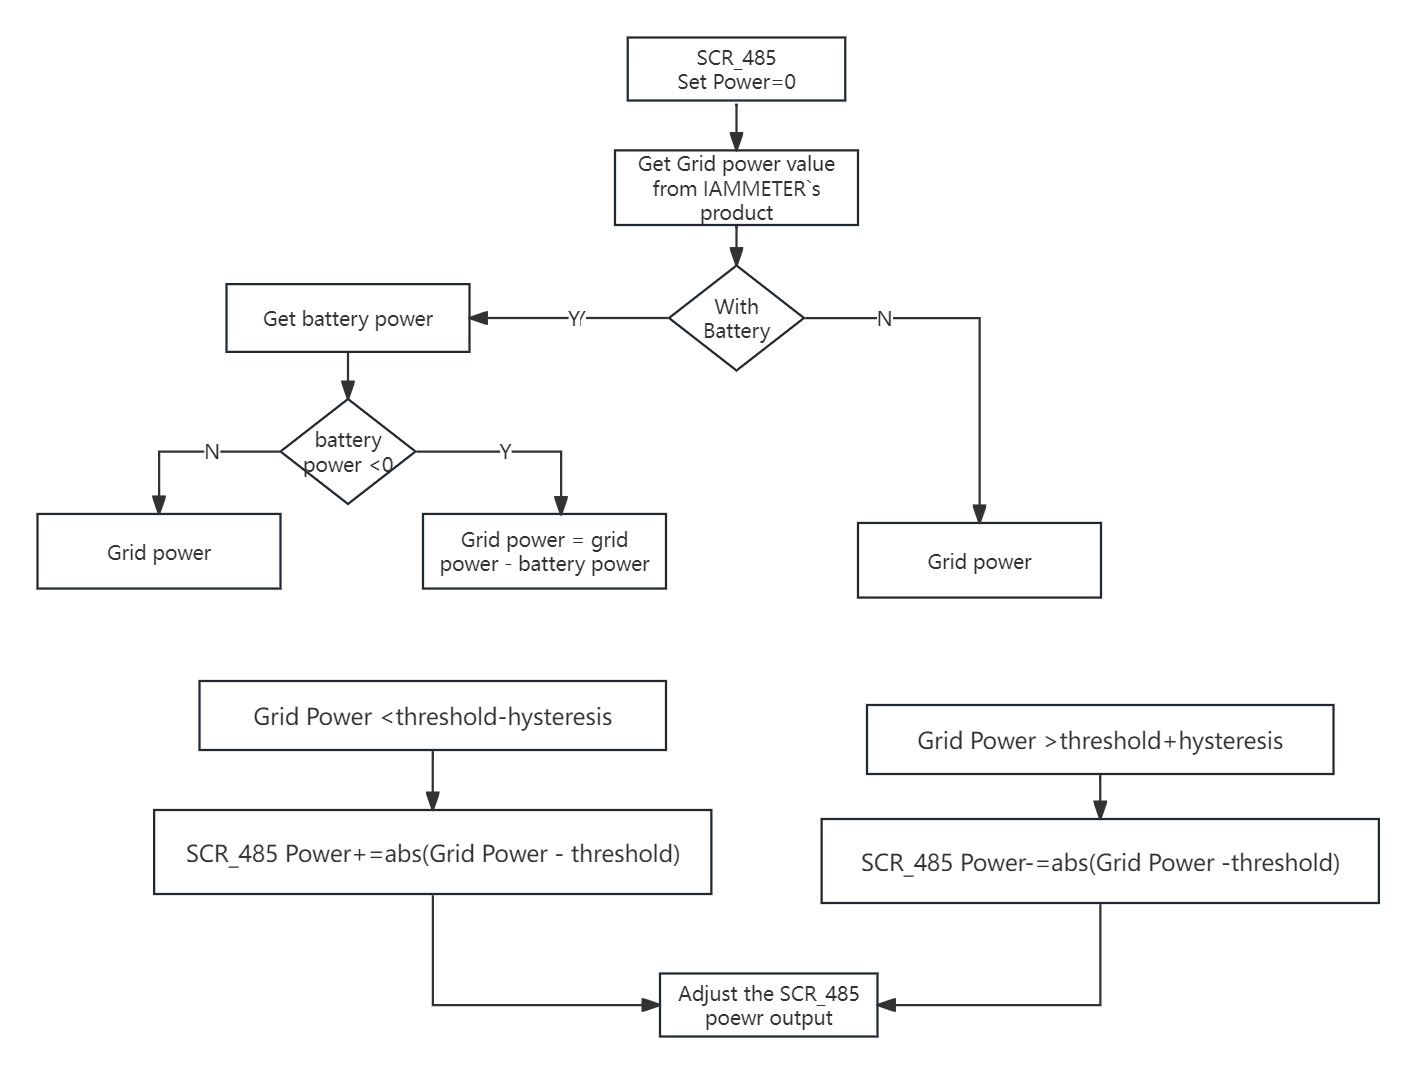
We may introduce a "Use Battery" option later. The control flow is outlined in the attached diagram. When the "Use Battery" option is disabled, the system will check if the battery is discharging (battery power < 0).
If the battery is discharging, it will use the difference between grid power and battery discharging power as a reference. For example:
- When the grid power = 0 and battery power = -1000W (discharging), the calculation would be:
- Grid power - battery power = 0 - (-1000W) = 1000W
In this case, the SCR-485 will adjust its power output by reducing it according to this value.
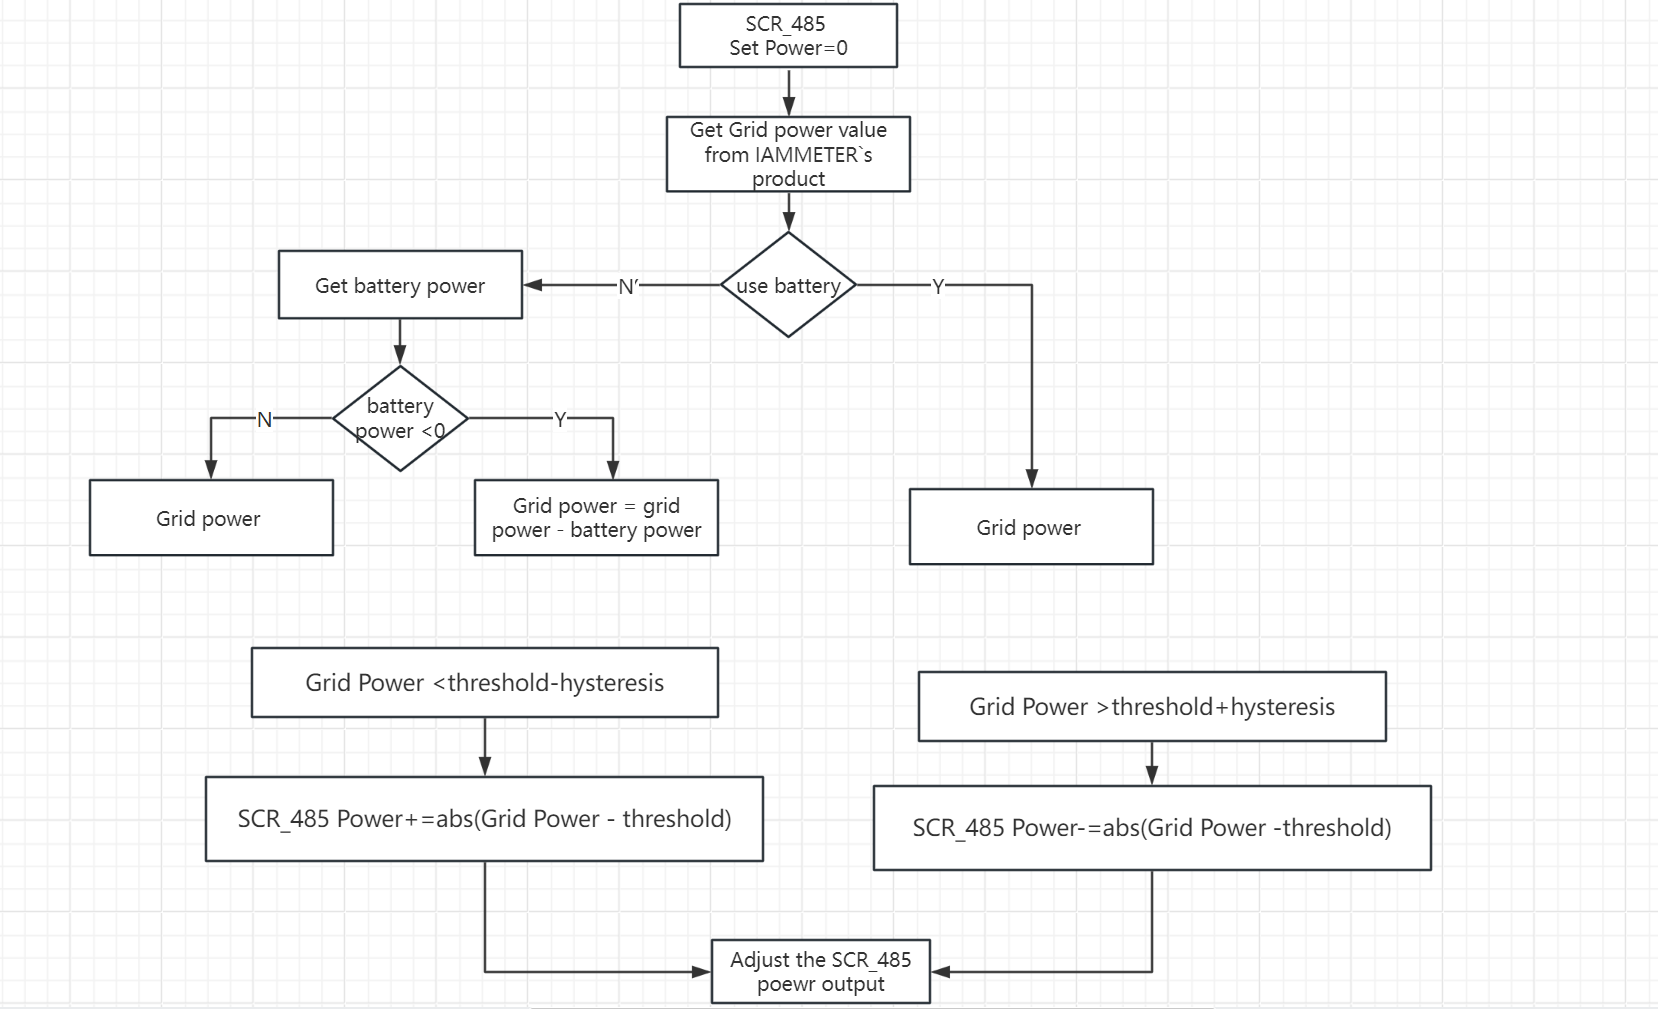
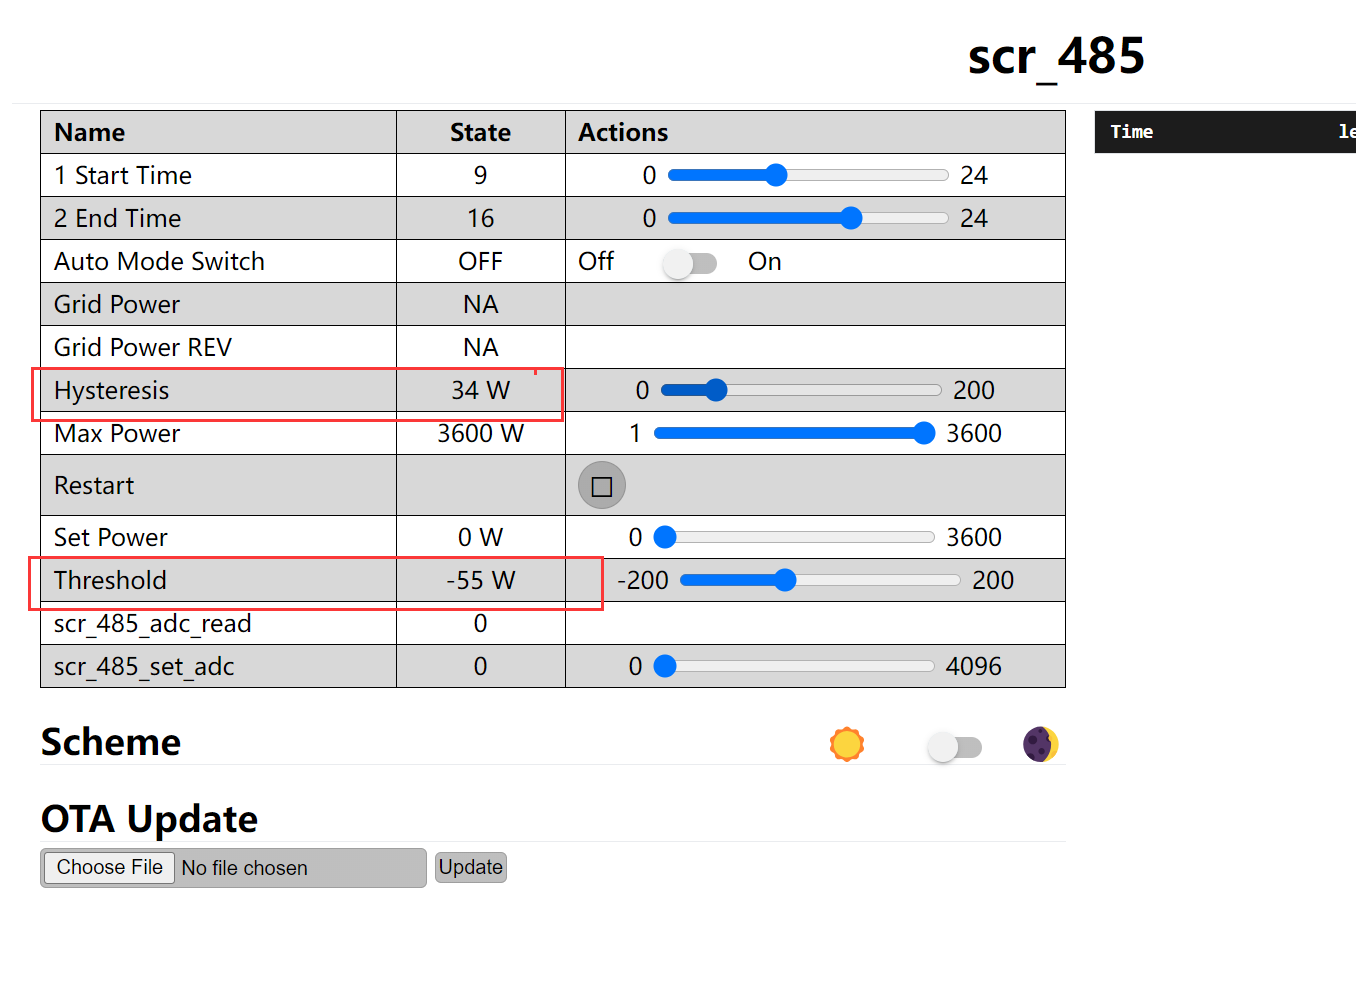
Before we introduce the "Use Battery" option, you can conduct a simple test by setting the threshold and hysteresis as follows:
- Example: Threshold = -55 and Hysteresis = 34.
The SCR-485 will then decrease power when the grid value exceeds the sum of the threshold and hysteresis, calculated as:
- Threshold + Hysteresis = -55 + 34 = -21.
Consider a scenario where the battery maintains a kettle's power at 2kW, and the grid power is zero. Since zero grid power is greater than -21, the SCR-485 will reduce the output by 50W (adjustment value = grid power - threshold = 50W).
As long as the grid power is zero, the SCR-485 will reduce the power output. It will continue to do this until the grid power reaches a minimum export level of -21W. This means that the device aims to ensure that at least -21W is being exported to the grid, adjusting the output as necessary based on the actual grid power measured.
Please ensure the maximum power setting is correct. If you are using a kettle with a maximum power of 2kW, set the maximum power limit to 2000W on the SCR-485. Incorrect settings for maximum power can impact the effectiveness of the adjustment.
Indeed, this approach, requiring extra exported power to the grid, isn't the optimal method for adjustment—it's more of a simple test. It can help verify the functionality and effectiveness of the control system under specific conditions, but for long-term operations, a more efficient and possibly more sophisticated method might be necessary to optimize energy usage and costs without relying on grid export.
https://github.com/lewei50/Solar-PV-Monitoring/blob/master/ESPHome/scr-485.yaml
The latest scr-485.yaml has added the With Battery mode. If you set '3 With Battery' to off, the gridpower will be subtracted from the battery power and then you can set and adjust the set power. 'off' is disable the battery powered
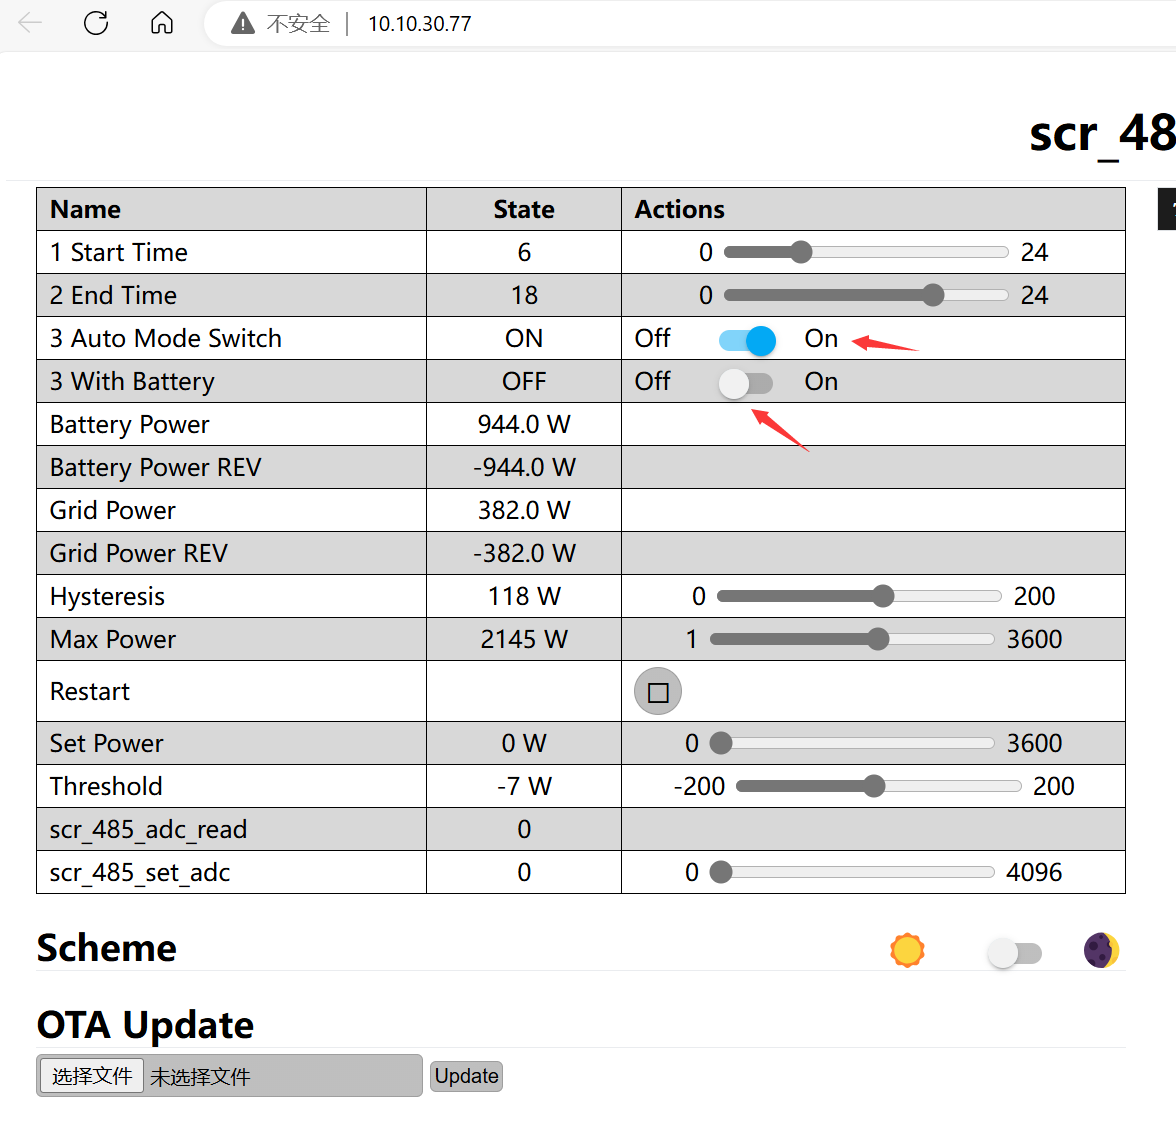
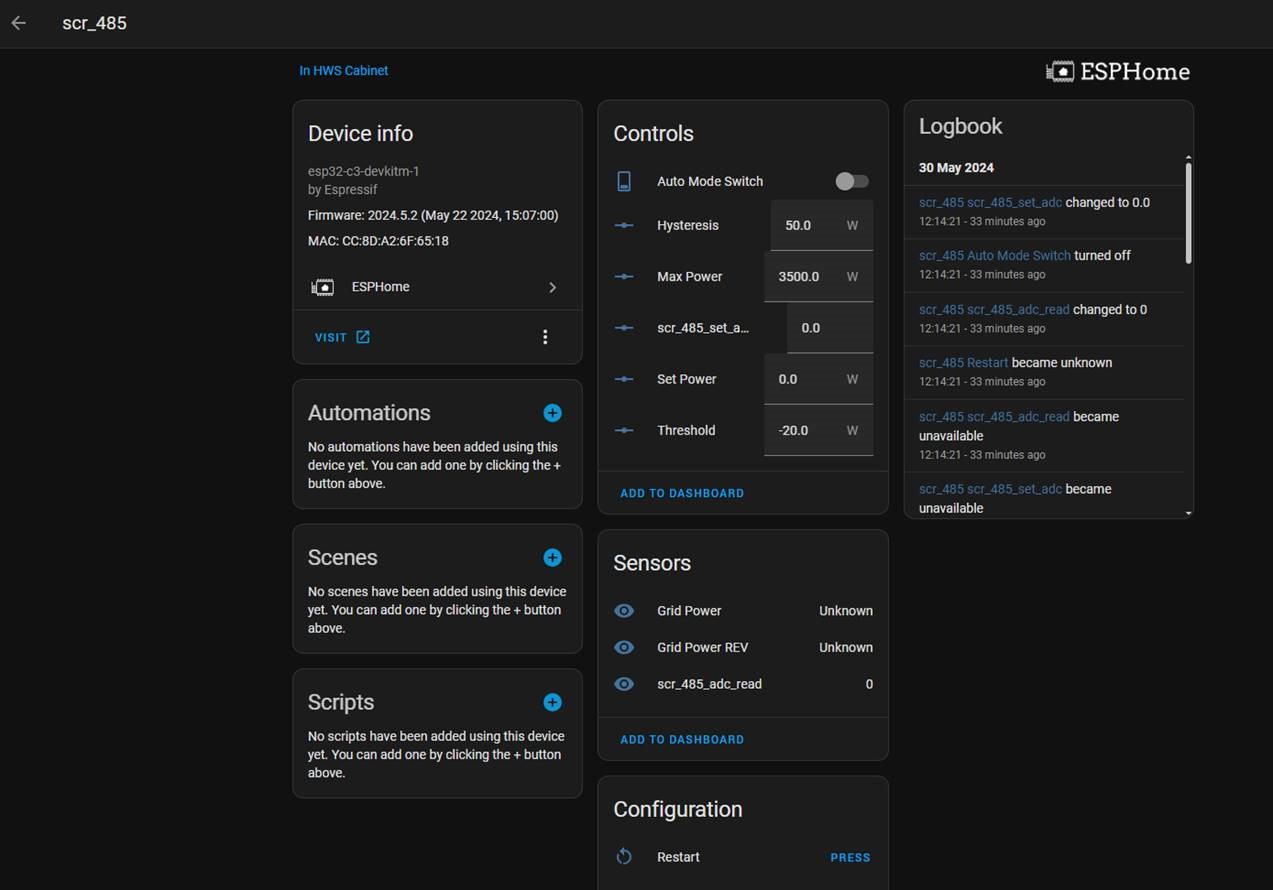
Awesome. I'm looking through this new file now. I've uploaded to the device, Here's the activity I'm seeing. Looks like this is as intended.
This change however introduces device rebooting again.
https://www.youtube.com/watch?v=eiFv_EDIgEM
Thank you very much for your test, which is different from the results of our test. We analyze the possible reasons
for the time, I've gone back to a Home assistant solution
My goal is to be able to heat the water if there's enough power to do that and still have some spare to either charge the battery or export something to the grid. The threshold I set was 400w spare. I have a large solar array (30kW) and 2x Tesla Powerwall. I don't want to wait for the battery to charge before heating the water. The slower the batteries charge, the better for their health/longevity.
Here's my logic. I create a template sensor that sums the grid flow and battery charge. In my case I swap export of solar and battery charge to positive values and import of solar and discharge of battery to negative values in this sensor. So an overall positive integer over 400w means I can heat the water
To line up with update intervals, every 6 seconds If the spare power exceeds 400w, then the scr_485_set_power is increased by 250w and conversely if the spare power drops below 100, the scr_485_set_power is reduced by 500w. This way the power can slowly be increased in surplus, and more quickly decreased if solar drops away suddenly or another load is turned on. Sometimes I might have 15,000w (15kW) of surplus (limited by grid rules) or a little more if I can charge the battery while exporting if the sun and time is right.
There's also a toggle (Boolean) which is activated twice per cycle so that I can flash the background colour on the hot water system page in HA so I get a visual when the automation fires. Not needed, but added a visual reference to the process.
Here's the automation
Not too shabby yesterday for winter
Also, when I start reporting the analysis as requested to receive this product, do I place it here in this post or in a new thread?
Do I wait for further logic revisions or start putting up analysis with the process I'm using.
I appreciate my arrangement here with the amount of solar and batteries is not the same as most systems out there.
Please use a new thread for this ,thanks
Hi Greg:
This is a step-by-step tutorial https://www.iammeter.com/newsshow/quickstart-scr485
Please update to the latest YAML version
We change the logic regarding the option of "with battery" as below.
If the "with battery" is enabled ,then the battery power would be considered in the calculation of the solar surplus.
Otherwise ("with battery" is off), the battery power would not be concerned.